
This guide shows successfully running my iMac Pro 2018 Coffeelake/Z370 Customac Build with macOS Mojave. You can also System Update up to the newest one smoothly after finishing the installation.
This post constitutes a new macOS 10.14 Mojave Desktop Guide for Coffeelake/Z370, which certainly can still grow and improve by your estimated user feedback. This macOS 10.14 Mojave Desktop Guide based on the Gigabyte Z370 Aorus Gaming 7. However, also other Z370 mainboard models or 300series mainboards of other brands might be compatible with this guide after likely considering and implementing few mandatory modifications not accounted by this guide.
[Review] Intel i9-9900 X-Series + GA-X299 Designare EX+ Dual LG Ultrafine System in macOS Mojave
[Edited] 2019.04.28 – Gigabyte X299 Designare EX Mother Board with i9-9900X added
[Edited] 2018.04.11 – The Guide edited to 10.14.4 official downloaded
[Edited] 2018.01.27 – The Guide edited to 10.14.3 official downloaded
[Edited] 2019.01.27 – Gigabyte Z390 Aorus Ultra and Gigabyte Z390 Designare Mother boards’ EFI added as well
[Edited] 2019.01.12 – Gigabyte Z390 Aorus Master’s EFI added in this guide.
[Edited] 2018.12.22 – The Guide edited to 10.14.2 official downloaded
- Plus, I am working on Z390 Board (Z390 Aorus Master) to make everything is ok with it like Z370 Board.
[Edited] 2018.11.28 – Updated Version 10.14.2 beta using System Preferences and Titan Ridge Support!! in Bios F11
- Titan Ridge is now officially working well in Z370 Aorus Gaming 7 (F11) and other Gaming series.
[Edited] 2018.11.05 – Updated Version 10.14.1 using System Preferences
- I updated EFI folder
- Bios updated to F10, ready for intel 9th CPU
- I tested Gigabyte-Z390 (not Z370) Aorus Master with 8086K (8700K)
- Working with current guide and GC-Alpine Ridge and GC-Titan Ridge are well compatible
- Z370 and Z390 -> Alpine Ridge or Titan Ridge
Z390 -> Titan Ridge or Alpine Ridge
[Edited] 2018.10.25 – LG Ultrafine 5k sleep/awake issue fixed!HotPlug working perfect! See my »»»LG Ultrafine 5K guide.
[Edited] 2018.10.08 – Updated version 10.14.0

It is the logical continuation of my 10.13 iMac pro and iMac Z370 Build and Desktop Guides. Those guides have finalized since 10.13.6 final version was released and no more update would be. This Mojave guide depends on necessary modifications for later versions of Mojave until the final version will be released.
The i3 (4-core) was chosen as the Coffeelake/Z370 Configuration Model in order to minimize the guide development costs. It has been already replaced within the goal configuration by the i7-8700K (6 core). All other Coffeelake models are compatible with this guide as like my Coffeelake/Z370 System is up, fully stable and fully functional. And now I am using i7-8086K which has exactly the same structure of 8700K but better performance usually. Any other Coffeelake CPUs would be ok with this guide but need some SMBIOS change properly.
Before starting with all detailed instructions, please find a Hardware Overview that provides a buying idea for your own RIG addressed within this guide
A) Hardware Overview
- CPU: Intel Core i7-8086K Coffeelake 6-Core 4.0 GHz (5.0 GHz Turbo) LGA 1151 and working with 8700K as well.
- Motherboard: Gigabyte Z370 Aorus Gaming 7 (Ver.1.0)
- GPU: Sapphire Radeon RX Vega 64 8GB HBM2 HDMI / Triple DP Liquid Cooling PCI-E Graphics Card 21275-00-40G
- Ram Memory: 64GB G.SKILL Ripjaws V Series DDR4 16gb x 4ea, 3000mhz
- System Disks: Samsung 960 EVO NVME 500gb (macOS) + 950 PRO NVME 512gb (Windows 10)
- Power: Rosewill PHOTON Series 1050W Full Modular Gaming Power Supply
- Case: Deep Cool Quadstellar
- Mouse & Keyboard: Razer Mamba HYPERFLUX & FIREFLY HYPERFLUX BUNDLE and Apple Magic Keyboard
- Monitors: LG UltraFine 5K, LG 4K Cinema
- CPU Cooling System: NZXT Kraken X62 (RL-KRX62-02) Liquid Cooling
- Thunderbolt 3 (USB-C) adaptor: GC-Alpine Ridge or GC-Titan Ridge
(compatible with Z390 board, not Z370 but it could work without bios option and Hot Plug working with my SSDT)
B) Gigabyte BIOS Configuration


1.) /M.I.T/Advanced Frequency Settings/
a.) Extreme Memory Profile: (X.M.P): Profile1
2.) /M.I.T/Advanced Frequency Settings/Advanced CPU Core Settings
a.) Active Cores Control: Auto
b.) Hyper-Threading Technology: Enabled
c.) Intel Turbo Boost Max Technology 3.0: Enabled
d.) Intel Speed Shift Technology: Enabled
e.) Enhanced Multi-Core Performance: Enabled/Disabled
f.) CPU Enhanced Halt (C1E): Enabled
g.) C6/C7 State Support: Enabled
h.) Package C State limit: C6
i.) CPU EIST Function: Enabled
j.) Energy Efficient Turbo: Disabled
3.) /M.I.T/Advanced Memory Settings/
a.) Extreme Memory Profile (X.M.P): Profile1
4.) /BIOS/
a.) Boot Numlock State: Disabled/Enabled
b.) Security option: Setup
c.) Full-Screen Logo Show: Enabled
d.) Fast Boot: Disabled
e.) CSM Support: Disabled
5.) /BIOS/Secure Boot/
a.) Secure Boot Enable: Disabled
6.) /Peripheral/Thunderbolt Configuration/
a.) Security Level: No Security
7.) /Peripherals/USB Configuration/
a.) XHCI Hand-off: Enabled
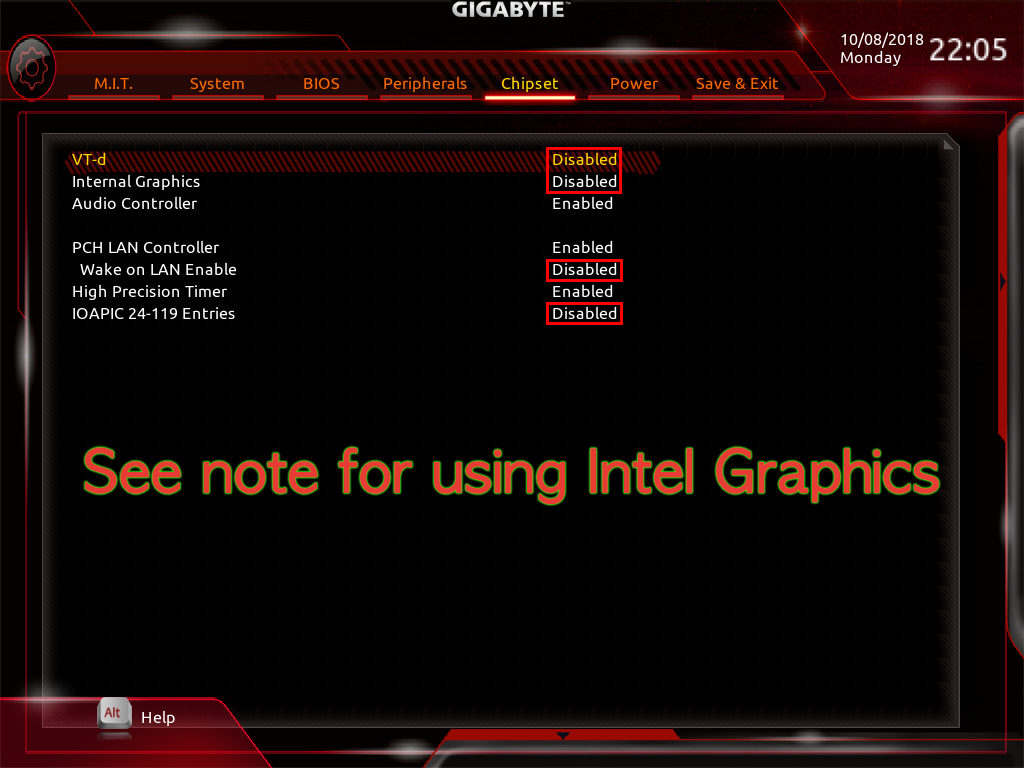
8.) /Chipset/
a.) VT-d: Disabled
b.) Internal Graphics: Disabled (NOTE: If you are using IGPU only, you can use ‘Enabled’ option)
9.) /Power/
a.) Platform power management: Disabled
10.) F10 /Save& Exit/
C) iMac Pro macOS 10.14 Mojave System Setup
Below, one finds a detailed description of the Clean Install of macOS Mojave 10.14.0 – special iMacPro build. This also includes the iMacPro EFI-Folder Preparation as well as the iMac Pro macOS Mojave 10.14.0 Installer Package and iMac Pro macOS Mojave 10.14.0 USB Flash Drive Installer Creation. One also finds instructions for a direct iMac Pro conversion of a functional Coffeelake/Z370 system with SMBIOS System Definition different from iMacPro1,1 and a standard macOS build implementation, as well as for the subsequent iMac Pro macOS Mojave Update Procedure.
C.1) iMac Pro EFI-Folder Preparation
In order to successfully boot a macOS USB Flash Drive Installer or System Disk on a Customac system, both drives must be equipped with an EFI-Folder in their EFI partitions. In this section, we will prepare a fully equipped EFI-Folder with SMBIOS iMacPro1,1 System definition.
1.) Download and unzip my macOS Mojave EFI.zip to your Desktop.
Z370 Aorus Gaming7EFI_Mojave.zip Z390 Aorus Master and UltraEFI_Mojave.zip Z390 DesignareEFI_Mojave.zip X299 Designare EXEFI_Mojave.zip2.) Open the config.plist in /EFI/Clover/ with the latest version of Clover Configurator, proceed to the “SMBIOS” Section and complete the SMBIOS iMacPro1,1 Serial Number, Board Serial Number, and SMUUID entries.
These details are mandatory to successfully run iMessage and FaceTime on your iMac Pro System. Note that all other iMacPro1,1 SMBIOS Details are already implemented in the config.plist
Press several times the “Generate New” Button next to serial number text field.
In the final step, open a terminal, enter repeatedly the command “uuidgen”, and copy the output value to the SMUUID field in the “SMBIOS” Section of the Clover Configurator. Or you can simply “Generate New” Button next to SMUUID text field.
Finally, save the modified config.plist.
You now have a fully equipped EFI-Folder.
C.2) iMac Pro macOS Mojave 10.14.4 – Installer package and a bootable USB Creation
To make the macOS Mojave 10.14.4 – Installer follow the individual steps below:
createInstaller.sh will automatically create on any macOS System the “Install Mojave.app” for macOS Mojave 10.14.4 in the /Applications folder.
Just download and unzip createInstaller.sh.zip and run the following terminal commands:
cd ~/Downloads
chmod +x createInstaller-10.14.4-SB.sh
./createInstaller-10.14.4-SB.sh
If you have troubles with the automated method, use below method:
1.) Open a terminal and create a “041-49229” directory on your Desktop. Subsequently, change to the newly created directory. All this can be done with the following terminal commands:
mkdir ~/Desktop/041-49229/
cd ~/Desktop/041-49229/
2.) Download the following files from the Apple server (public links) to your ~/Desktop/041-49229/ directory by a copy & paste of the following terminal commands:
curl https://swdist.apple.com/content/downloads/57/19/041-49229/2djabx33nlymwl0cfgagnk2ytst22y9byp/041-49229.English.dist -o 041-49229.English.dist
curl http://swcdn.apple.com/content/downloads/57/19/041-49229/2djabx33nlymwl0cfgagnk2ytst22y9byp/InstallAssistantAuto.smd -o InstallAssistantAuto.smd
curl http://swcdn.apple.com/content/downloads/57/19/041-49229/2djabx33nlymwl0cfgagnk2ytst22y9byp/AppleDiagnostics.chunklist -o AppleDiagnostics.chunklist
curl http://swcdn.apple.com/content/downloads/57/19/041-49229/2djabx33nlymwl0cfgagnk2ytst22y9byp/AppleDiagnostics.dmg -o AppleDiagnostics.dmg
curl http://swcdn.apple.com/content/downloads/57/19/041-49229/2djabx33nlymwl0cfgagnk2ytst22y9byp/OSInstall.mpkg -o OSInstall.mpkg
curl http://swcdn.apple.com/content/downloads/57/19/041-49229/2djabx33nlymwl0cfgagnk2ytst22y9byp/BaseSystem.chunklist -o BaseSystem.chunklist
curl http://swcdn.apple.com/content/downloads/57/19/041-49229/2djabx33nlymwl0cfgagnk2ytst22y9byp/InstallESDDmg.chunklist  -o InstallESDDmg.chunklist
curl http://swcdn.apple.com/content/downloads/57/19/041-49229/2djabx33nlymwl0cfgagnk2ytst22y9byp/BaseSystem.dmg -o BaseSystem.dmg
curl https://swdist.apple.com/content/downloads/57/19/041-49229/2djabx33nlymwl0cfgagnk2ytst22y9byp/RecoveryHDMetaDmg.pkm -o RecoveryHDMetaDmg.pkm
curl http://swcdn.apple.com/content/downloads/57/19/041-49229/2djabx33nlymwl0cfgagnk2ytst22y9byp/RecoveryHDMetaDmg.pkg -o RecoveryHDMetaDmg.pkg
curl https://swdist.apple.com/content/downloads/57/19/041-49229/2djabx33nlymwl0cfgagnk2ytst22y9byp/InstallAssistantAuto.pkm -o InstallAssistantAuto.pkm
curl http://swcdn.apple.com/content/downloads/57/19/041-49229/2djabx33nlymwl0cfgagnk2ytst22y9byp/InstallAssistantAuto.pkg -o InstallAssistantAuto.pkg
curl http://swcdn.apple.com/content/downloads/57/19/041-49229/2djabx33nlymwl0cfgagnk2ytst22y9byp/InstallInfo.plist -o InstallInfo.plist
curl https://swdist.apple.com/content/downloads/57/19/041-49229/2djabx33nlymwl0cfgagnk2ytst22y9byp/MajorOSInfo.pkm -o MajorOSInfo.pkm
curl http://swcdn.apple.com/content/downloads/57/19/041-49229/2djabx33nlymwl0cfgagnk2ytst22y9byp/MajorOSInfo.pkg -o MajorOSInfo.pkg
curl https://swdist.apple.com/content/downloads/57/19/041-49229/2djabx33nlymwl0cfgagnk2ytst22y9byp/InstallESDDmg.pkm -o InstallESDDmg.pkm
curl http://swcdn.apple.com/content/downloads/57/19/041-49229/2djabx33nlymwl0cfgagnk2ytst22y9byp/InstallESDDmg.pkg -o InstallESDDmg.pkg
3.) Create the installer.pkg on your Desktop with the following terminal command:
cd ..
productbuild --distribution ./041-49229/041-49229.English.dist --package-path ./041-49229/ installer.pkg
4.) Create the “Install MacOS Mojave” in the /Applications folder of your System Disk with the following terminal command:
sudo /usr/sbin/installer -pkg installer.pkg -target /
In case that you receive an error message, ignore the latter and proceed with 5.)
5.) Now add the following files to your “Install macOS Mojave.app” with the following terminal commands:
sudo cp ./041-49229/InstallESDDmg.pkg /Applications/Install\ macOS\ Mojave.app/Contents/SharedSupport/InstallESD.dmg
sudo cp ./041-49229/AppleDiagnostics.dmg /Applications/Install\ macOS\ Mojave.app/Contents/SharedSupport/
sudo cp ./041-49229/AppleDiagnostics.chunklist /Applications/Install\ macOS\ Mojave.app/Contents/SharedSupport/
sudo cp ./041-49229/BaseSystem.dmg /Applications/Install\ macOS\ Mojave.app/Contents/SharedSupport/
sudo cp ./041-49229/BaseSystem.chunklist /Applications/Install\ macOS\ Mojave.app/Contents/SharedSupport/
Verify your “Install Mojave.app” for completeness. You should now have a complete macOS Mojave Installer package in your /Applications Folder.
Follow the individual steps detailed below to successfully create a bootable iMac Pro macOS Mojave 10.14 USB Flash Drive Installer.
1.) Format a USB Flash Drive of your choice (source, named USB) with HFS+ [(Mac OS Extended (Journaled)] and a GUID partition table by means of Apple’s Disk Utility on any other Hackintosh or Mac of your choice. This will create an empty HFS+ Partition and a yet empty EFI-partition on your iMac Pro macOS USB Flash Drive Installer.
2.) With the macOS Mojave 10.14 Installer Package in your /Application Folder, connect your USB Flash Drive (named USB) and run the following terminal command:
sudo /Applications/Install\ macOS\ Mojave.app/Contents/Resources/createinstallmedia --volume /Volumes/USB --nointeraction
3.) For successfully booting your iMac Pro macOS USB Flash Drive Installer, it must contain a valid EFI- Folder with an SMBIOS iMacPro1,1 system definition. Thus, copy the EFI-Folder you prepared in Section C.1) to the yet empty EFI Partition of your macOS USB Flash Drive Installer. Mount your USB’s EFI using Clover Configurator and Copy your EFI folder to the mounted USB’s EFI.
You now have a fully functional and bootable macOS Mojave 10.14 USB Flash Drive Installer.
C.3) iMac PromacOS Mojave 10.14 Clean Install
Follow the individual steps detailed below to successfully setup macOS Mojave 10.14 on a virgin system drive of your choice (NVMe, SSD or HDD).
1.) In order to perform a clean install of macOS Mojave 10.14, prepare a virgin NVMe, SDD or HDD destination drive for the iMac Pro macOS installation by formatting the drive with HFS+ [(Mac OS Extended (Journaled)] and a GUID partition table by means of Apple’s Disk Utility on any other Customac or Mac of your choice. This will create an empty HFS+ Partition and a yet empty EFI-partition on the drive.
You can skip 1.) and format your SSD during the installation screen in section 6.) using the Disk Utility option.
2.) Copy the EFI-Folder you prepared in Section C.1) to the yet empty EFI Partition just like you did it for your USB installer bootable.
3.) Now connect the Destination Drive to your Customac System and boot the latter with the plugged macOS Mojave 10.14 USB Flash Drive Installer, created in Section C.2)
4.) While booting your system, press the “F12” and Select to boot from your macOS USB Flash Drive Installer.
5.) Subsequently, click on the USB Flash Drive Installer Icon in the clover boot menu to boot the respective macOS Installer partition on your macOS USB Flash Drive Installer.
6.) After a successful boot, pass the individual steps of the macOS 10.14 Mojave installation menu and finally select the destination drive of your macOS 10.14 Mojave Installation, which should be logically the system disk you successfully configured above. In the next step, the Installer will create a macOS Mojave 10.14 Installer Partition on the system disk and subsequently reboot your system.
7.) During the system reboot, just press again the F8 button to enter the BIOS boot menu. Select again to boot from your USB Flash Drive. In contrary to 6.), click this time on the “Install MacOS..” icon in the clover boot screen to boot the newly created macOS Mojave 10.14 Installer Partition on your system disk.
8.) After the successful boot, you will enter now the macOS Mojave 10.14 Installer Screen with a progress bar starting at about 34 minutes.
9.) After another reboot, press “Del” button to enter the BIOS boot menu. Select to boot with your System Disk EFI-folder as primary and save/exit. Click on the “MacOS Mojave” icon on the clover boot screen to boot the new macOS Mojave partition of your system disk.
10.) After successful boot ignore the requested iCloud registration (You can do this after logged in) and you will have your first iMac Pro macOS Mojave 10.14 system.
D) Post Installation Process
There are not many things you should do if you are using my EFI.zip. However, there are couple things to do look nice and stable in your Customac.
D.1) System Overview CPU Cosmetics
Use below link to fix your CPU Cosmetics.
D.2) Gigabyte Z370 Aorus Gaming 7 PCI Device Implementation (Optional guide for buyers only)
This is a totally optional guide to imply your PCI Devices’ information in your System profile using proper SSDTs.

SSDTs for Thunderbolt Hotplug fix and USB port limit patch are very convenient from the latter OS updates.
The more detail information is on the download page.
Z370 Aorus Gaming7EFI_Mojave.zip Z390 Aorus Master and UltraEFI_Mojave.zip Z390 DesignareEFI_Mojave.zip X299 Designare EXEFI_Mojave.zipHow to apply:
Drag any SSDT files you want to apply in EFI>Clover>ACPI>patched.
If you are using different slot number or change model name etc, use MaciASL tool.
Open SSDT file that you want to modify and replace the value and save it.
E) Benchmarking
Dual displays – LG ultrafineDisplay 5K Display (TB3) + LG 4K Cinema Display (DP)


Geekbench CPU Benchmark: Coffeelake Intel i7-8086K (5.0GHz)
- Multi-Core Sore: 32295
- Single-Core Sore: 6718
Geekbench OpenGL and Luxmark OpenCL Benchmarks:
- OpenGL Sore: 204177
- OpenCL Sore: 31124
Cinebench Benchmarks:
- OpenGL Sore: 167.83
- CPU Sore: 1643


Congratulations!
Now you have the most advanced macOS in coffeelake Desktop system.
If you have any questions, leave comments or e-mail to joe@climbjoe.tv
Last modified: May 6, 2020


HI,
Do I have to disable IOAPIC 24 – 119 Entries in BIOS in Mojave?
Hey Joe,
Used your EFI and Bios setting s and now my Hackintosh has black screen until it gets to the Mojave log on screen. Never get to see Clover. The only difference in my Hackintosh is that I have Radeon RX580 instead of Vega 56. I’m using “Whatevergreen.kext instead of VegaGraphicsFixup.kext.
Any idea why I would not see graphics before the mojave log on screen?
Thanks
Is it possible to have dual LG Ultrafine 5K monitors on the Hackintosh? Thank you for your kindly help!
my hardware configuration is 99% the same as yours. BUT my Hackintosh sometimes get freeze except mouse pointer. Do you have such experience?
Thank you for this build guide. I had planned an almost exact build such as yours. My questions: can I also use an external Thunderbolt storage array along with the LG Ultrafine? And, I had planned to use the Gigabyte Titan Ridge card but you mentioned that this is not 100% compatible. What is the issue with the Titan Ridge? And do you expect Apple to provide Titan Ridge compatibility in an upcoming MacOS release?
Could you update the DSDT to use bios F10? I was considering buying your SSDT’s however I had some BIOS issues and am running F10 stable now, so I rather not downgrade to F7 (also for possible i9 9900k compatibility).
Hi Joe, Looks like a great Hackintosh build! Like Micheal, I was looking for a bit more info about your experience getting the LG Ultrafine monitors to work (I’ve got the 4k). I’m specifically wondering about the functionality you get from the alpine ridge card: Can you adjust brightness from the keyboard? (or any other usb functionality like sound?) Also, hoping for a bit more info on the problems with Titan Ridge cards. Finally, how do you set up the alpine ridge with the GPU — You connect display port from the gpu into the alpine ridge, and then thunderbolt/usb-c… Read more »
Hi,Joe
Mojave EFI’s DSDT and SSDT are exclusively for Gaming 7?
You said you tested with Gigabyte Aorus Master.
Can DSDT and SSDT also be used for Gigabyte Aorus Master?
I plan to purchase Gigabyte Aorus Master.
Hi I have built a very similar system with Asus z370 rx 580 and i7 8700. Everything is working great. Getting excellent benchmark scores, but when I try to export a video in final cut pro x, it will not export and system becomes mostly unresponsive until reset. Mouse still moves but os is very laggy. This is my first computer build and very happy with it so far. Any help to get exporting to work would be appreciated
I Have to ask if I understand this correctly. Do you have TB3 Hotplug working completely on the Z370 Gaming 7 for this setup? Alpine Ridge?
I got a few problem with my lg 5K display,
I used Gigabyte z390 Aorus Pro and GC-Alpine Ridge
I got everything worked out, only there is no sound output with 5k monitor.
the system showed I have two monitor plugin…..
and I can’t figure out what’s the problem:(
plz help
I downloaded your EFI from the download section.
NO more two monitor problems, but My audio gone….
also, I can’t reboot my computer, there are many error showed up when I try to shut down my computer.
🙁 so sad for a newbe wanna play with Hackintosh.
but thanks for your help and I am going to pay for this, if u can help me out using teamview
Hi Joe. Have a z370 Gigabyte Aorus Gaming 5 build. Very similar to your Gaming 7. Gigabyte issued a BIOS update, F11, that adds support for Titan Ridge card. So I got that card. It works under Windows and I can pass through video from the Vega to TB3 monitor, but I can’t get it to recognize my TB3 storage array. I suspect this has to do with DDST/SSDT configuration. I’d like to get this working and am happy to buy your SSDT/DDST files to support your work. But I’d like to get a little better idea of whether this… Read more »
Hi Joe, I just added an “Alpine Ridge” ver2 TB3 card to my Customac iMac Pro and can’t seem to get it going 100%. I’ve followed your EFI as I have an Aorus Gaming 7 (bios f7) w/ 8700k. I’ve bought your SSDT for Z370-TB3-AlpineRidge, and have that in the right spot. I basically installed the card, booted into Windows 10 installed the Gigabyte drivers and activated the card. If I restart the machine right into Mojave 10.14.2 right away the TB3 card works fine in OSX. When I cold boot the machine into Mojave the TB3 devices don’t work.… Read more »
Joe, Quick question. Is it possible to use SMBIOS 18.3 so that I could enable headless IGPU while using an Alpine Ridge card on my rig? I’ve got the same Aorus Gaming 7 board but when I try to enable internal graphics in bios I get the “Circle w/ Slash” when trying to boot with the Alpine Ridge card installed.
Should I upgrade to BIO F11, F10 or F7 to use this guide?
Hi Joe, just bought your entire Mojave DSDT & ALL SSDTs package, but I’m not sure if the DSDT is the F11 or which one. (There only one DSDT file included in the package).
Following your instructions to setup a new installation of Mojave you say to format the drive to HFS+. Does this actually work or does the Mojave installer reformat to Apfs? I’d like to use HFS+ if possible. Thanks!
hello,
When I use your dsdt.aml file I got this:
Waiting on IOProviderClassIOResourcesIOResourceMatchboot-uuid-media
I only change two things: I don’t use the onboard sound card (the give me an ACPI error too) .
And I use Sata drive (wich is the issue I think)
It launch fine without it, slecting bios.aml (in colover boot menu)
Will this work with the following config:
– z390 AORUS ultra +9700k
– gc-titan ridge
– rx580 pulse
– LG 5k
I found the master and ultra very close following other guides for the master (but doesn’t cover tb3)
Thx
Ho Joe,
I bought your SSDT package for Z390 Aorus Master.
I have the BCM943602CS on the ABWB PCIE Card. How could i adapt your ARPT.AML that i would work with that card? Which is Slot 3 your .aml is made for?
Hey Joe, Do you have any SATA drives in this setup? I’m assuming that you’re using the M2M_32G and M2A_32G connectors for the M.2 drives, which from my understanding of the mobo manual would cancel out at least 2 of the SATA connections. I don’t want to buy drives that I won’t be able to use.
Hi Joe. I have a question. I bought your DSDT and SSDT package. I really love what you are doing here and have a fully working High Sierra hackintosh with TB3 enabled. But someone asked me a question I couldn’t answer, and one that I’m wondering about. Does the use of your DSDT and SSDT files put me in danger of being hacked, spyware and so on? How do I know that these files does not contain malicious code that enables you or someone else to observe or access my hackintosh? I’m not experienced in code or software development and… Read more »
Hi Joe! I recently upgraded from High Sierra to Mojave and everything is working fine except few things that keep coming back. When I start hackintosh on cold boot it stucks so I have to force shutdown and on the second try it boots without problem. I dont know what makes this problem to happen but on High Sierra it didnt so if you have solution it would be great.Second issue is regarding thunderbolt .When cold boot, in system info it writes Thunderbolt@76,0,0 but when restart it changes to Thunderbolt@60,0,0.Is there any solution for theese issues?
[…] iMac Pro Build […]
With Mojave 10.14.3, I can’t hot plug SATA drives using the Z390 Designare SATA ports (HotPlug is enabled in BIOS) or a PCIe SATA card with Marvell 88SE9230 chipset (https://www.amazon.com/gp/product/B00AZ9T264). Using a SATA drive dock, the drives are only recognized and mounted if they are turned on at startup.
Any idea on how to fix it in 10.14.3? The old methods under 10.13 don’t seem to work
Thanks
When I boot, the computer never reaches the Login Screen…
Using your EFI folder…
I just get a blank screen.
Using RX580 card
Used your configuration to create a High Sierra system.
I purchased your files but I am having issues just installing Mojave in the first place.
My system:
Gigabyte Aorus Z370 Gaming 7
i7-8700K
Sapphire Vega 56
16GB G.Skill Ripjaws V
500GB Samsung 960 EVO NVMe SSD
I’ve followed your tutorial to the T but get the following error when I try and boot from the USB flash drive to install:
Waiting on IOProviderClass IOResources IOResourceMatch boot-uuid-media
I’ve also tried taking out the Vega 56 and just using iGPU but it doesn’t resolve the issue.
Can we replace the shiki.kext with whatevergreen?
[…] iMac Pro Build […]
when I replace shiki.kext and intelgraphicsfixup and nvidiagraphicsfixup with whatever green….
Proper Monitor Rotation is not “saved” between boots…
Hi
Thanks for your great guide. In Free Mojave EFI for Aorus Master and Ultra, there is no SSDT despite of your indication. Why?
Hi there. I got this going with a Z390 Designare i9-9900k. I am running 2 Radeon VII GPUs, I dont know how to Edit the DDST files. Can i contact you and pay you to write the DDST for them in slot 1 and 3 ?? and my audio output from the MB is no longer working??
Climb Joe : I have a GIGABYTE Z390 I AORUS PRO WiFi and cannot seem to get it up and running. Can I pay you to create an EFI folder and DSDT that works with this system? I am using the board without any extra graphics card (No Radeon or Nvidia Card, just Intel GPU)… Your system seems to work fine with my main system boards which is why I am reaching out for help. Please let me know how much you would charge for this…
Hi there, Just purchased the full package after trying to get TB3 to work but still not working and must be me doing something wrong ? Everything else is working perfect but no Thunderbolt? I have the Alpine Ridge card in the top PCI slot farthest from the CPU (not sure if that matters) then a Fenvi Wifi card in the 3rd slot and finally my Vega64 in the slot closest to the CPU. I have a 1TB Samsung 970 pro NVme ssd in the middle port and 32gb of ram installed.. I have copied all the aml files to… Read more »
There Hot swapping does not work 🙁 Cant unplug it while started and every 8-10 reboots I have to log into windows then back into OS X again to get it top reboot and reappear on my desktop
Hi,
Looking for help in different forums, I came to your website.
I’ve been working on a new Hakingtosh project for 3 weeks, with a Dell 5820, but with an i7 9800x, and NVIDIA Quadro P2000, (Intel Core X series CPUs with Intel X299 chipset.
I have been inspired by several tutorials with the X299 base, especially yours, for what has been well explained. But it is impossible for me to go beyond the first load lines:
“pci configuration end bridges 9 devices 114”
Can you tell me why this mistake might be possible?
Thanks