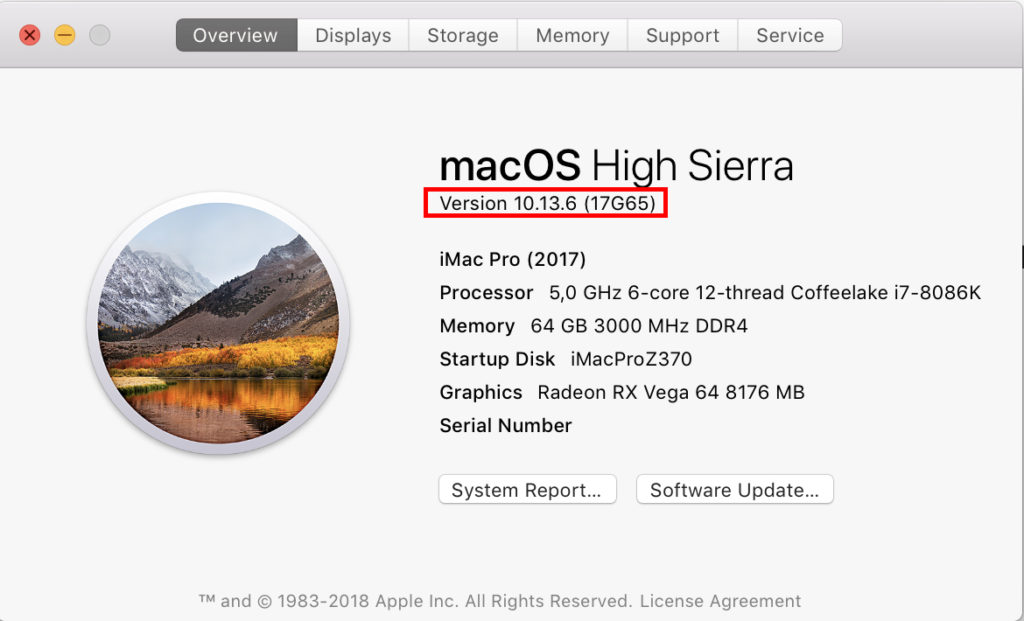
This guide shows successfully running my iMac Pro 2018 Coffeelake/Z370 Customac Build with macOS High Sierra 10.13.6 (17G65) – Final Release
This post constitutes a new macOS 10.13 High Sierra Desktop Guide for Coffeelake/Z370, which certainly can still grow and improve by your estimated user feedback. This Coffeelake/Z370 10.13 High Sierra Desktop Guide based on the Gigabyte Z370 Aorus Gaming 7. However, also other Z370 mainboard models or Z370 mainboards of other brands might be compatible with this guide after likely considering and implementing few mandatory modifications not accounted by this guide.
[Edited] 2018.09.15 – Updated version 10.13.6 – Final Release!!!
[Edited] 2018.05.18 – Updated version 10.13.5
[Edited] 2018.04.16 – SSDT-PCI guide updated
[Edited] 2018.04.14 – DSDT +SSDT-UIAC guide updated
[Edited] 2018.04.02 – Added an option for TH3 Hot-plug (still in progress for Gigabyte)
[Edited] 2018.03.30 – Updated version 10.13.4
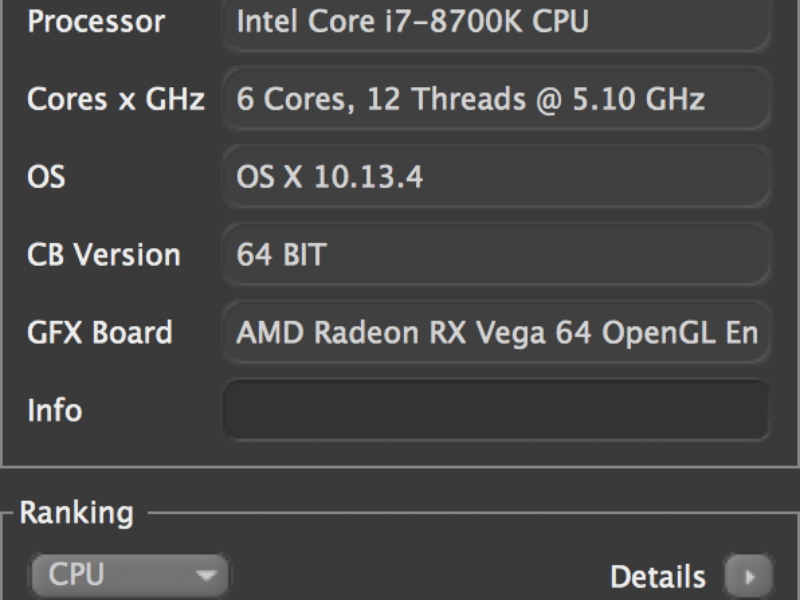
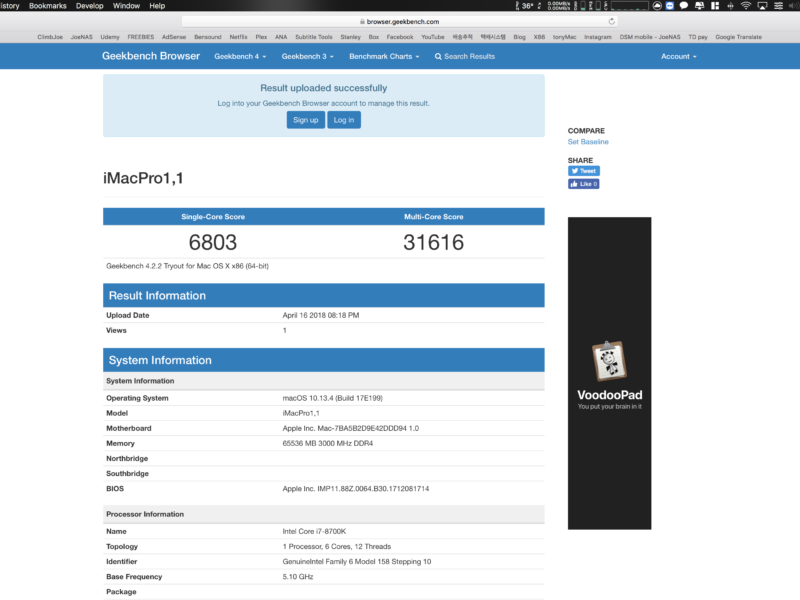
This is my current system’s Bench scores (CPU Delided Overclocked to 5.1GHz)


The i3 (4-core) was chosen as the Coffeelake/Z370 Configuration Model in order to minimize the guide development costs. It has been already replaced within the goal configuration by the i7-8700K (6 core). All other Coffeelake models are compatible with this guide as like my Coffeelake/Z370 System is up, fully stable and fully functional.
A) Hardware Overview
- CPU: Intel Core i7-8700K Coffeelake 6-Core 3.7 GHz (4.7 GHz Turbo) LGA 1151 and working with 8086K as well.
- Motherboard: Gigabyte Z370 Aorus Gaming 7
- GPU: Sapphire Radeon RX VEGA 64 8GB LIQUID COOLING
- Ram Memory: G.SKILL Ripjaws V Series DDR4 16gb x 2ea, 3000mhz
- System Disks: 960 EVO NVME 500gb (macOS) + 950 PRO NVME 512gb (Windows 10)
- Power: Rosewill PHOTON Series 1050W Full Modular Gaming Power Supply
- Case: Deep Cool Quadstellar
- Mouse & Keyboard: USB Mouse and Apple Magic Keyboard
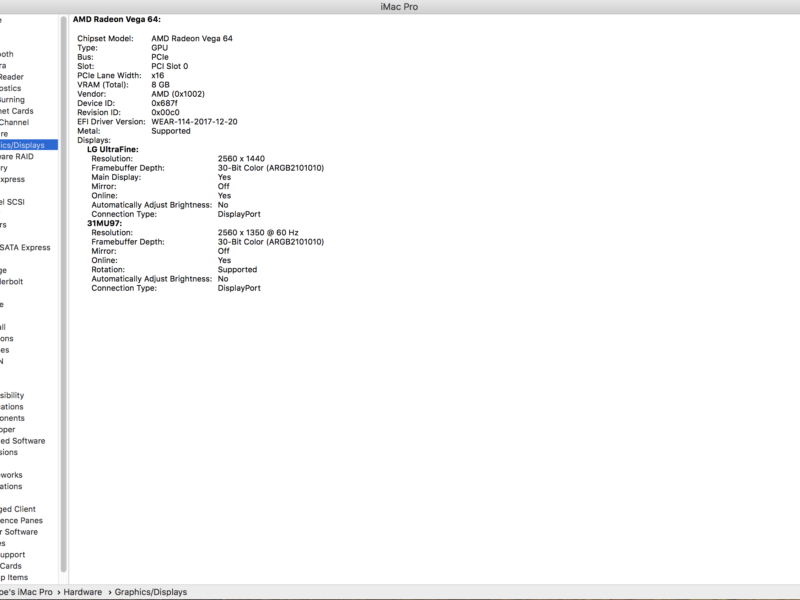
- Monitors: LG UltraFine 5k, LG 4k Cinema
- CPU Cooling System: NZXT Kraken X62 (RL-KRX62-02) Liquid Cooling
- Thunderbolt 3 (USB-C) adaptor: GA-Alpine Ridge for LG Ultrafine 5K monitor
B) Gigabyte BIOS Configuration
You can change the BIOS setting to Optimized Default and change it to the following settings. If possible, update the BIOS to the latest version.
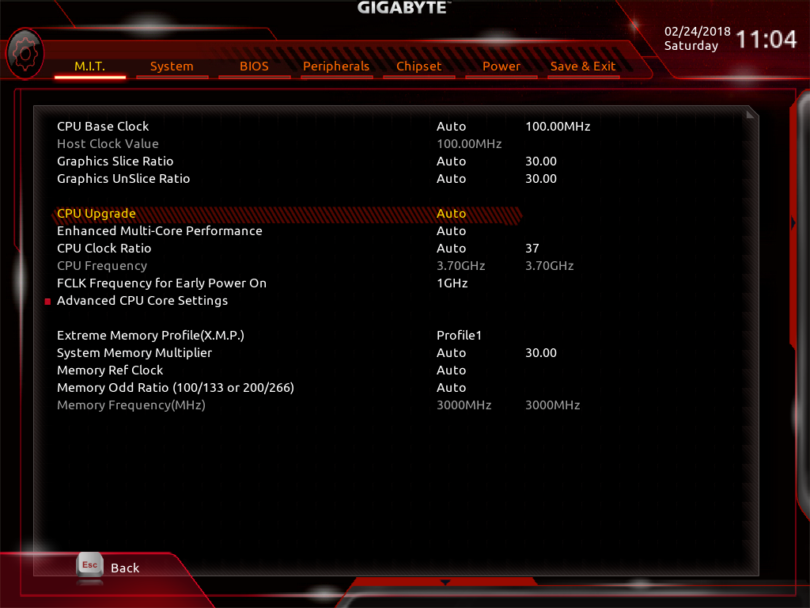

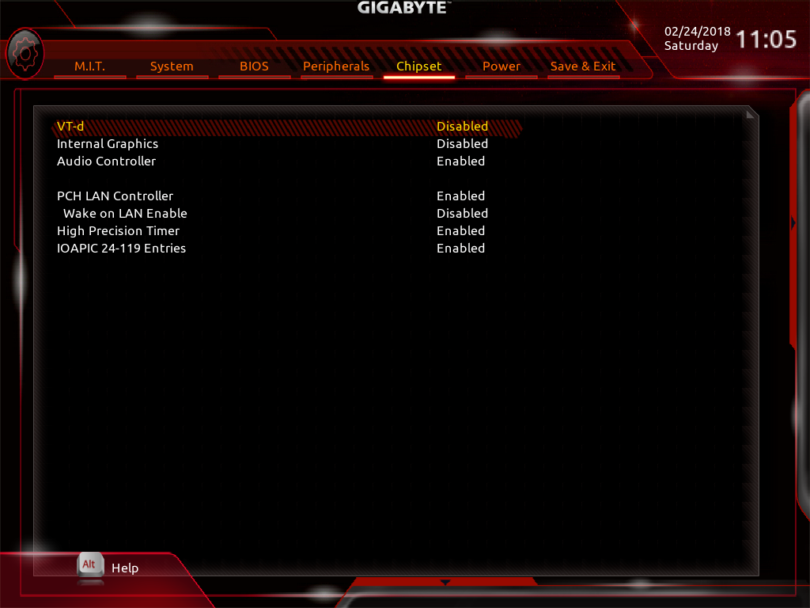

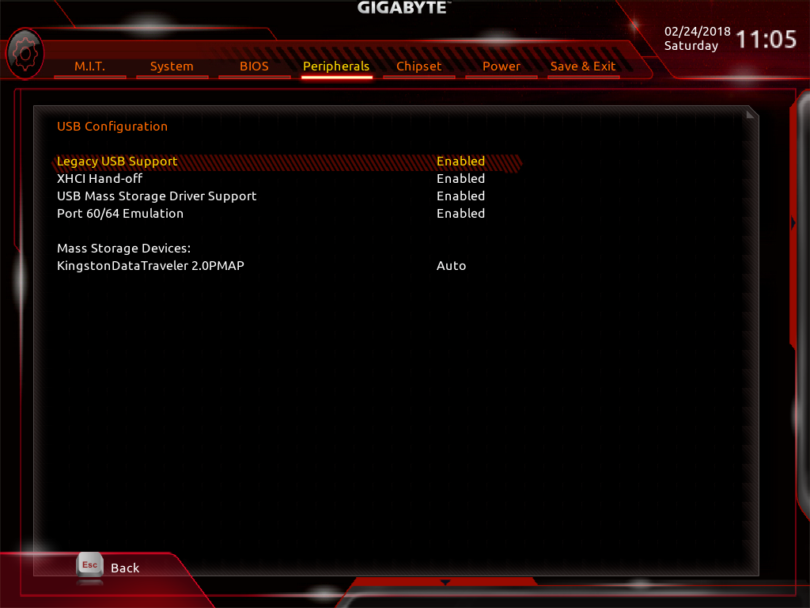
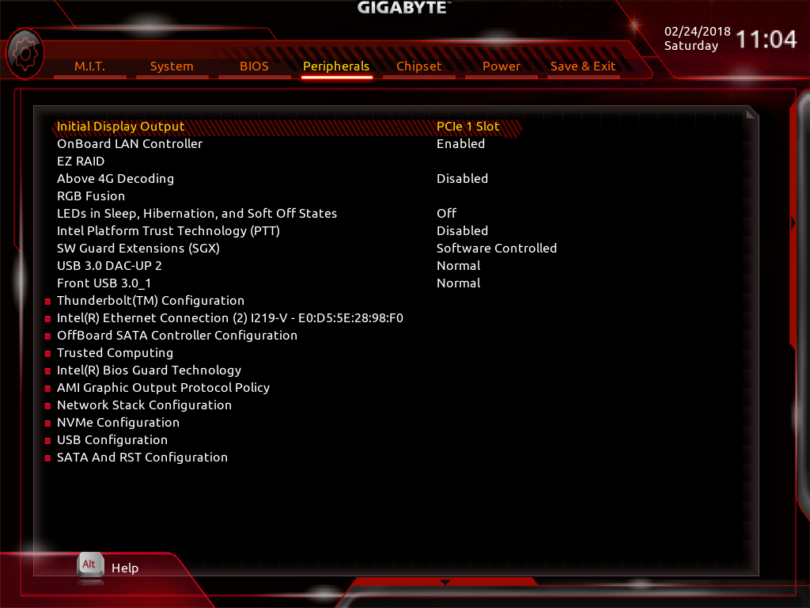


Depending on your Gigabyte boards and the BIOS version, there may be a difference in the names, but there seems to be no major difference.
Once you have set up your MacOS installation, it’s a good idea to change it to your own configuration later.
The attached photos are the bios configuration of the system I am currently using. (Gigabyte Z370 Aorus Gaming 7 Bios v.F5M, F5 updated! F6 updated! F7 Updated!!)
C) iMac Pro macOS 10.13 High Sierra System Setup
Below, one finds a detailed description of the Clean Install of macOS High Sierra 10.13.6 (17G65) – Final Release – special iMacPro build (C.4). This also includes the iMacPro EFI-Folder Preparation (C.1) as well as the iMac Pro macOS High Sierra 10.13.6 (17G65) – Final ReleaseInstaller Package (C.2) and iMac Pro macOS High Sierra 10.13.6 (17G65) – Final Release USB Flash Drive Installer Creation (C.3). One also finds instructions for a direct iMac Pro conversion of a functional Coffeelake/Z370 system with SMBIOS System Definition different from iMacPro1,1 and a standard macOS build implementation (C.5), as well as for the subsequent iMac Pro macOS High Sierra Update Procedure.
C.1) iMac Pro EFI-Folder Preparation
In order to successfully boot a macOS USB Flash Drive Installer or System Disk on a Customac system, both drives must be equipped with an EFI-Folder in their EFI partitions. In this section, we will prepare a fully equipped EFI-Folder with SMBIOS iMacPro1,1 System definition.
1.) Download and unzip to your Desktop.
Leave a request comment at the end of this post. or you could click the button to get it.
Download file HereEFI-Z370-iMacPro1,1
2.) Open the config.plist in /EFI/Clover/ with the latest version of Clover Configurator, proceed to the “SMBIOS” Section and complete the SMBIOS iMacPro1,1 Serial Number, Board Serial Number, and SMUUID entries. These details are mandatory to successfully run iMessage and FaceTime on your iMac Pro System. Note that all other iMacPro1,1 SMBIOS Details are already implemented in the config.plist
Press several times the “Generate New” Button next to serial number text field.
In the final step, open a terminal, enter repeatedly the command “uuidgen”, and copy the output value to
the SMUUID field in the “SMBIOS” Section of the Clover Configurator.
Finally, save the modified config.plist.
You now have a fully equipped EFI-Folder for subsequent implementations as detailed below.
C.2) iMac Pro macOS High Sierra 10.13.6 (17G65) – Final Release Installer Package Creation
To derive the macOS 10.13.6 (17G65) – Final Release Full-Package Installer follow the individual steps below:
createInstaller.sh will automatically create on any MacOS System the “Install High Sierra.app” for MacOS 10.13.6 (17G65) – Final Release SMBIOS iMacPro1,1 in the /Applications folder.
Just download and unzip createInstaller.sh.zip and run the following terminal commands:
cd ~/Downloads
chmod +x createInstaller.sh
./createInstaller.sh
Verify your “Install High Sierra.app” for completeness. You should now have a complete macOS High Sierra 10.13.6 (17G65) – Final Release Installer package in your /Applications Folder.
If you have the trouble with the automated method, use next method:
1.) Open a terminal and create a “091-76233” directory on your Desktop. Subsequently, change to the newly created directory. All this can be done with the following terminal commands:
mkdir ~/Desktop/091-94326/
cd ~/Desktop/091-94326/
2.) Download the following files from the Apple server (public links) to your ~/Desktop/091-86775/ directory by a copy & paste of the following terminal commands:
curl https://swdist.apple.com/content/downloads/29/03/091-94326/45lbgwa82gbgt7zbgeqlaurw2t9zxl8ku7/091-94326.English.dist -o 091-94326.English.dist
curl https://swdist.apple.com/content/downloads/29/03/091-94326/45lbgwa82gbgt7zbgeqlaurw2t9zxl8ku7/RecoveryHDMetaDmg.pkm -o RecoveryHDMetaDmg.pkm
curl http://swcdn.apple.com/content/downloads/29/03/091-94326/45lbgwa82gbgt7zbgeqlaurw2t9zxl8ku7/RecoveryHDMetaDmg.pkg -o RecoveryHDMetaDmg.pkg
curl http://swcdn.apple.com/content/downloads/29/03/091-94326/45lbgwa82gbgt7zbgeqlaurw2t9zxl8ku7/OSInstall.mpkg -o OSInstall.mpkg
curl https://swdist.apple.com/content/downloads/29/03/091-94326/45lbgwa82gbgt7zbgeqlaurw2t9zxl8ku7/InstallAssistantAuto.pkm -o InstallAssistantAuto.pkm
curl http://swcdn.apple.com/content/downloads/29/03/091-94326/45lbgwa82gbgt7zbgeqlaurw2t9zxl8ku7/InstallAssistantAuto.pkg -o InstallAssistantAuto.pkg
curl http://swcdn.apple.com/content/downloads/29/03/091-94326/45lbgwa82gbgt7zbgeqlaurw2t9zxl8ku7/BaseSystem.dmg -o BaseSystem.dmg
curl https://swdist.apple.com/content/downloads/29/03/091-94326/45lbgwa82gbgt7zbgeqlaurw2t9zxl8ku7/InstallESDDmg.pkm -o InstallESDDmg.pkm
curl http://swcdn.apple.com/content/downloads/29/03/091-94326/45lbgwa82gbgt7zbgeqlaurw2t9zxl8ku7/InstallESDDmg.pkg -o InstallESDDmg.pkg
curl http://swcdn.apple.com/content/downloads/29/03/091-94326/45lbgwa82gbgt7zbgeqlaurw2t9zxl8ku7/BaseSystem.chunklist -o BaseSystem.chunklist
curl http://swcdn.apple.com/content/downloads/29/03/091-94326/45lbgwa82gbgt7zbgeqlaurw2t9zxl8ku7/InstallESDDmg.chunklist -o InstallESDDmg.chunklist
curl http://swcdn.apple.com/content/downloads/29/03/091-94326/45lbgwa82gbgt7zbgeqlaurw2t9zxl8ku7/InstallInfo.plist -o InstallInfo.plist
curl http://swcdn.apple.com/content/downloads/29/03/091-94326/45lbgwa82gbgt7zbgeqlaurw2t9zxl8ku7/AppleDiagnostics.chunklist -o AppleDiagnostics.chunklist
curl http://swcdn.apple.com/content/downloads/29/03/091-94326/45lbgwa82gbgt7zbgeqlaurw2t9zxl8ku7/AppleDiagnostics.dmg -o AppleDiagnostics.dmg
curl https://swdist.apple.com/content/downloads/29/03/091-94326/45lbgwa82gbgt7zbgeqlaurw2t9zxl8ku7/MajorOSInfo.pkm -o MajorOSInfo.pkm
curl http://swcdn.apple.com/content/downloads/29/03/091-94326/45lbgwa82gbgt7zbgeqlaurw2t9zxl8ku7/MajorOSInfo.pkg -o MajorOSInfo.pkg
curl http://swcdn.apple.com/content/downloads/29/03/091-94326/45lbgwa82gbgt7zbgeqlaurw2t9zxl8ku7/InstallAssistantAuto.smd -o InstallAssistantAuto.smd
3.) If you are currently on an iMac Pro System, create the 10.13.6 (17G65) – Final Release installer.pkg on your Desktop with the following terminal command:
cd ..
productbuild --distribution ./091-94326/091-94326.English.dist --package-path ./091-94326/ installer.pkg
4.) Create the “Install MacOS High Sierra.app” in the /Applications folder of your System Disk with the following terminal command:
sudo /usr/sbin/installer -pkg installer.pkg -target /
5.) Now add the following files to your “Install High Sierra.app” with the following terminal commands:
sudo cp ./091-94326/InstallESDDmg.pkg /Applications/Install\ macOS\ High\ Sierra.app/Contents/SharedSupport/InstallESD.dmg
sudo cp ./091-94326/AppleDiagnostics.dmg /Applications/Install\ macOS\ High\ Sierra.app/Contents/SharedSupport/
sudo cp ./091-94326/AppleDiagnostics.chunklist /Applications/Install\ macOS\ High\ Sierra.app/Contents/SharedSupport/
sudo cp ./091-94326/BaseSystem.dmg /Applications/Install\ macOS\ High\ Sierra.app/Contents/SharedSupport/
sudo cp ./091-94326/BaseSystem.chunklist /Applications/Install\ macOS\ High\ Sierra.app/Contents/SharedSupport/
Verify your “Install High Sierra.app” for completeness. You should now have a complete macOS High Sierra 10.13.6 (17G65) – Final Release Installer package in your /Applications Folder.
C.3) iMac Pro macOS High Sierra 10.13.6 (17G65) – Final Release USB Flash Drive Installer Creation
Follow the individual steps detailed below to successfully create a bootable iMac Pro macOS High Sierra 10.13.6 (17G65) – Final Release USB Flash Drive Installer.
1.) Format a USB Flash Drive of your choice (source, named USB) with HFS+ [(Mac OS Extended (Journaled)] and a GUID partition table by means of Apple’s Disk Utility on any other Customac or Mac of your choice. This will create an empty HFS+ Partition and a yet empty EFI-partition on your iMac Pro macOS USB Flash Drive Installer.
2.) With the iMac Pro macOS High Sierra 10.13.6 (17G65) – Final Release Installer Package in your /Application Folder, connect your USB Flash Drive (named USB) and run the following terminal command:
sudo /Applications/Install\ macOS\ High\ Sierra.app/Contents/Resources/createinstallmedia --volume /Volumes/USB --applicationpath /Applications/Install\ macOS\ High\ Sierra.app --nointeraction
Alternatively, one can create the iMac Pro macOS USB Flash Drive Installer also by means of the Install Disk Creator.app.
Both Terminal or App methods take quite long time to make bootable USB so please be patient until finishing all the process (In my case, taking for almost an hour)
3.) Yet we have to make our iMac Pro macOS USB Flash Drive Installer also bootable. This can be partly done by means of the following terminal commands:
don’t forget the isolated dot “.” at the end of the last copy (cp) command below
cd /Volumes/Install\ macOS\ High\ Sierra
mkdir .IABootFiles
cd .IABootFiles
cp /Volumes/Install\ macOS\ High\ Sierra/System/Library/CoreServices/boot.efi .
With the terminal command:
ls boot.efi
you can subsequently verify that boot.efi is there where it should be.
If you mistake at this point, your USB Flash Drive Installer will not be bootable and the USB Flash Drive macOS Installer partition will be simply invisible in the Clover Boot Menu!
4.) Copy the EFI-Folder you prepared in Section C.1) to the empty EFI Partition of your iMac Pro macOS USB Flash Drive Installer.
You now have a fully functional and bootable iMac Pro macOS High Sierra 10.13.6 (17G65) – Final Release USB Flash Drive Installer.
D) iMac Pro macOS High Sierra 10.13.6 (17G65) – Final Release Clean Install on Coffeelake/Z370
Follow the individual steps detailed below to successfully setup macOS High Sierra 10.13.6 (17G65) – Final Release on a virgin system drive of your choice (NVMe, SSD or HDD).
1.) In order to perform a clean install of macOS High Sierra 10.13.6 (17G65) – Final Release, prepare a NVMe, SSD or HDD destination drive for the iMac Pro macOS installation by formatting the drive with HFS+ [Mac OS Extended (Journaled)] and a GUID partition table by means of Apple’s Disk Utility on any other Customac or Mac of your choice. This will create an empty HFS+ Partition and an empty EFI-partition on the drive.
2.) Copy the EFI-Folder you prepared in Section C.1) to the yet empty EFI Partition.
3.) Now connect the Destination Drive to your Customac System and boot the plugged iMac Pro macOS High Sierra 10.13.6 (17G65) – Final Release USB Flash Drive Installer, you’re created in Section C.2)
4.) While booting your system, press the F12 button to enter the BIOS boot menu. Select to boot from your iMac Pro macOS USB Flash Drive Installer.
5.) Subsequently, click on the USB Flash Drive Installer Icon in the clover boot menu to boot the respective macOS Installer partition on your iMac Pro macOS USB Flash Drive Installer
6.) After a successful boot, pass the individual steps of the macOS high Sierra 10.13 installation menu and finally select the destination drive of your macOS High Sierra 10.13 Installation, which should be logically the system disk you successfully configured above. In the next step, the Installer will create a macOS High Sierra 10.13 Installer Partition on the system disk and subsequently reboot your system.
7.) During system reboot, just press again the F12 button to enter the BIOS boot menu. Select again to boot from your USB Flash Drive. In contrary to 6.), click this time on the “Install MacOS..” icon in the clover boot screen to boot the newly created macOS High Sierra 10.13 Installer Partition on your system disk.
8.) After the successful boot, you will enter now the macOS High Sierra 10.13 Installer Screen with a progress bar starting at 34 minutes.
9.) After another reboot, press again the F12 button to enter the BIOS boot menu. Select to boot with your System Disk EFI-folder. Click on the “MacOS High Sierra” icon in the clover boot screen to boot the updated macOS High Sierra 10.13 partition on your system disk.
10.) After the successful boot, you will enter again the macOS High Sierra 10.13 Installer Screen with a progress bar starting at 18 minutes. After successfully registration at iCloud at the end of the macOS installation, you now have your first iMac Pro macOS High Sierra 10.13.6 (17G65) – Final Release build.
After the successful clean install or conversion, you can update your iMac Pro macOS Mojave build directly via the Appstore. In case of Mojave beta, it is recommended to clone your 10.13.6 (17G65) – Final Release System Disk with Carbon Copy Cloner (CCC) to a test drive and to update to Mojave Public Beta.
Also, any other future macOS Update can be directly performed via the Appstore.
E) System Overview CPU Cosmetics
As our Coffeelake CPU at present will not be properly recognized by OS X, Apple’s System Overview (“About This Mac”) reveals incomplete or simply wrong CPU details. Many times CPU’s like the i7-8700K are implemented as “unknown”. Follow method below to fix it.
Note that the following example is only valid for systems with English as the main system language. If your system language is German, French, Spanish, Chinese etc., substitute “English.lproj” in the individual commands by the “lproj” of your System language!
1.) Open a terminal and use the following commands:
cp /System/Library/PrivateFrameworks/AppleSystemInfo.framework/Versions/A/Resources/English.lproj/AppleSystemInfo.strings ~/Desktop/
sudo mv /System/Library/PrivateFrameworks/AppleSystemInfo.framework/Versions/A/Resources/English.lproj/AppleSystemInfo.strings /System/Library/PrivateFrameworks/AppleSystemInfo.framework/Versions/A/Resources/English.lproj/AppleSystemInfo.strings-Backup
2.) Open “AppleSystemInfo.strings” on your Desktop with TextWrangler and change
<key>UnknownCPUKind</key>
<string>Unknown</string>
to whatever you want. In my case I choose:
<key>UnknownCPUKind</key>
<string>3,7 GHz 6-core 12-thread Coffeelake i7-8700K</string>
Save “AppleSystemInfo.strings”
3.) Run the following terminal commands:
sudo codesign -f -s - ~/Desktop/AppleSystemInfo.strings
sudo cp ~/Desktop/AppleSystemInfo.strings /System/Library/PrivateFrameworks/AppleSystemInfo.framework/Versions/A/Resources/English.lproj/
and reboot your system.
F) Optional change for GA-Alpine Ridge TH3 adaptor This method is No more needed
If you have a TH3 adaptor, you can make a TH3 Hotplug enabled.
Go to you EFI>Clover>Config.plist, open it at clover configurator.Go to Devices and Click ‘+’ in Arbitrary section.Add the codes like this.PCIAddr* Comment 01:00.00 PCI THUNDERBOLT 1578 0
Key*                 value*         Value Type
PCI-Thunderbolt      1              NUMBER
IOName               pci-bridge     STRING

G) How to apply DSDT + SSDTs (Buyer’s only)
First, please check out the latest EFI.zip, DSDT.zip and SSDTs. There is the file name with numbers which is modified date.
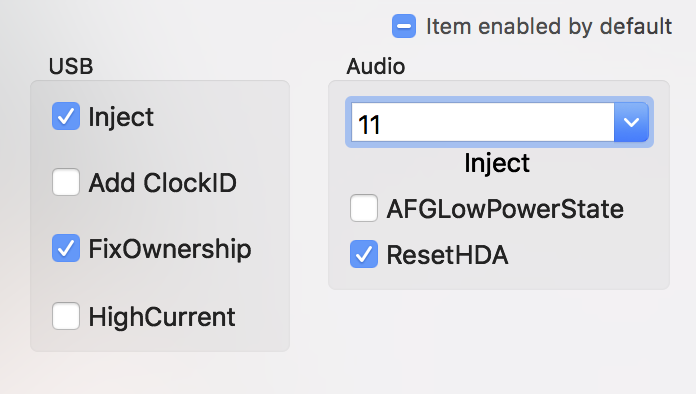
- Audio
Some ppl asked me about the Audio setting. I am using my monitors audio which is working great without any patch or kext. However, if you are using internal audio, you can have two options.
a. You can use AppleALC which is already included in kext folder.
b. There is kext named VoodooHDA.kext // it is easily found in google search.
Simply use either of kext whatever you prefer. But do not use both files at the same time.
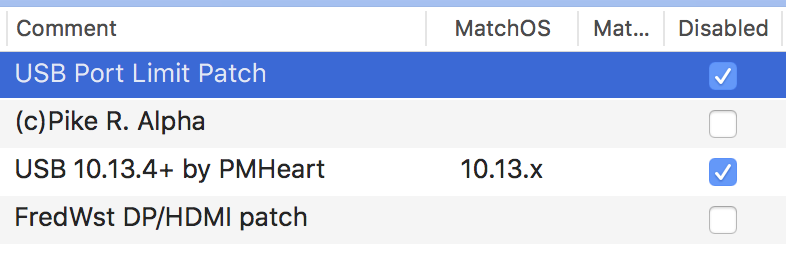
2. DSDT +SSDT-UIAC implement
Put those files in EFI > Clover > ACPI > Patched
No more worry about USB port limit patch in Kext and Kernel area. Simply, disable or remove.
3. SSDT-PCI implement
* PCI implement requires DSDT and SSDT-UIAC
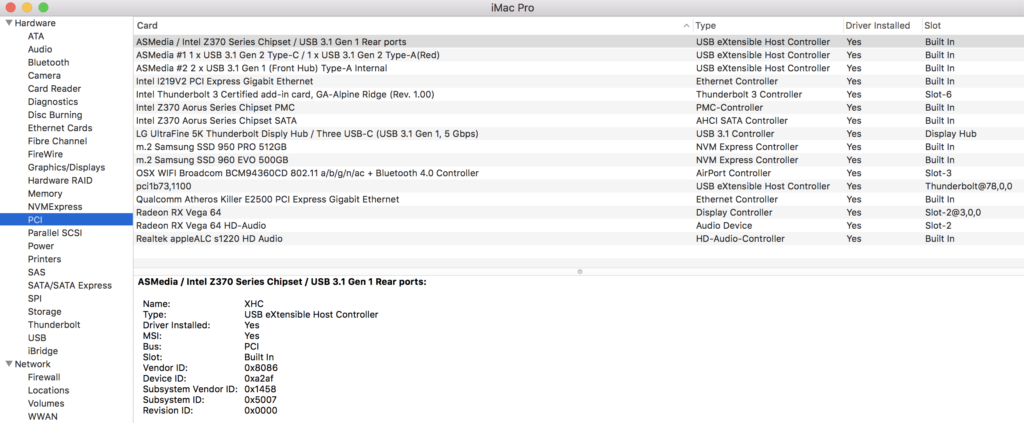
Applying SSDT-PCI is able to show cosmetic and real PCI devices in your Customac.
However, this modification is a process that requires special DSDT patches. If you do not follow the instructions below, you can cause Kerner panic.
a. Download SSDT-PCI first and then save it with DSDT and SSDTs in Patched folder.
b. After mounting the EFI, add the following DSDT hot patches to the ACPI> DSDT> Patches section of the config file. Use TextWrangler.
If you are using my EFI’s config, do like below picture.
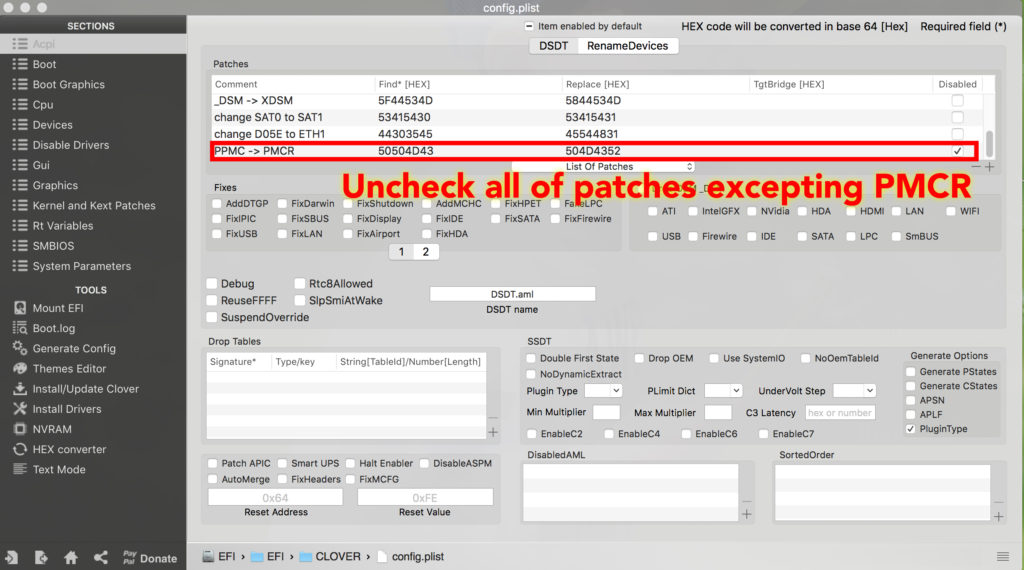
c. Save it. Reboot.
d. Download MaciASL to edit the SSDT-PCI
e. If you see different devices from original SSDT-PCI, you can find ‘Model’ and ‘Name’ of devices to replace with your own model and name. Use MaciASL.
f. See the example, so if you want to change the model name and slot number of your wifi device, open the SSDT-PCI and use find tool (command +f) and find the ‘
OSX WIFI Broadcom BCM94360CD 802.11 a/b/g/n/ac + Bluetooth 4.0 Controller‘ and simply replace it with your own device name. You can see slot number there so put your number instead of ‘3’
(Do not change any values rather than model, name and slot. All other variable’s are already set to GA-Z370 Aorus Gaming 7 board only)
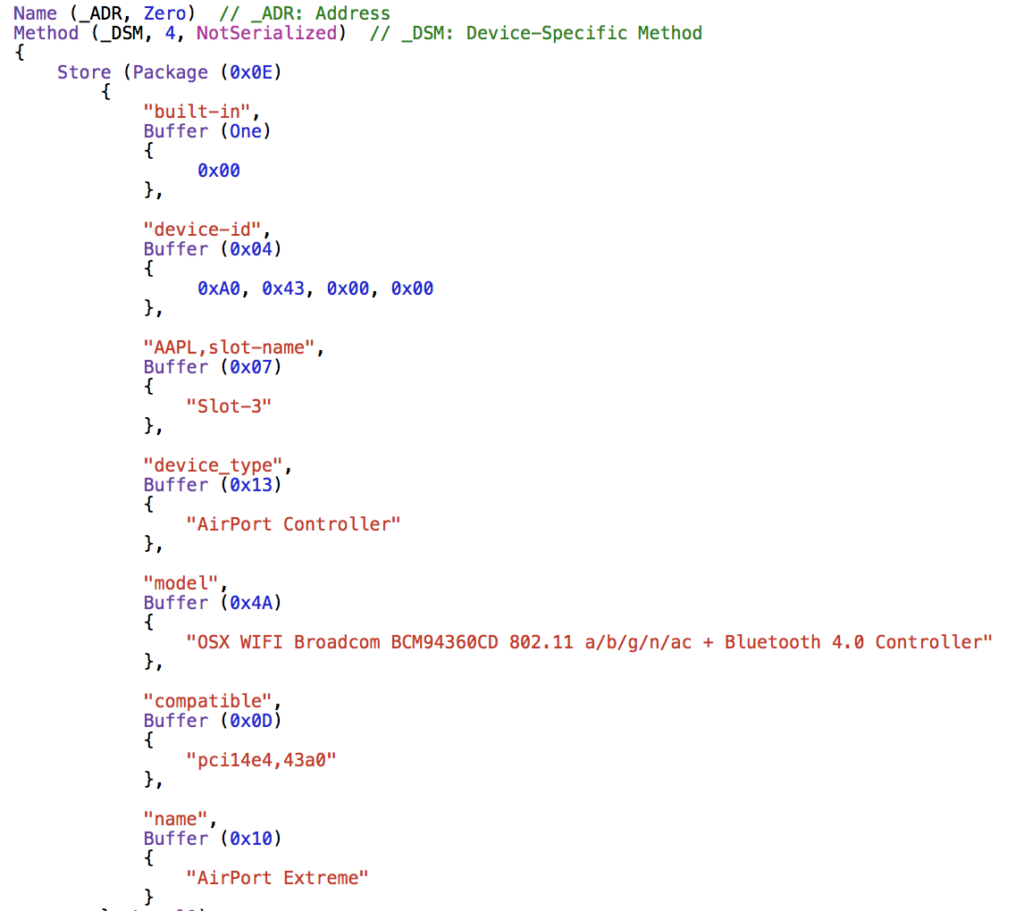
g. If you have different AMD GPU, you should google its FB name.
h. Save it and reboot your Mac.
4. SSDT-TB3 implement (TBA)
H) Benchmarking (Dual monitors: 5K + 4K)

Geekbench CPU Benchmark: Coffeelake Intel i7-8700K (3.7GHz)
- Multi-Core Sore: 27914
- Single-Core Sore: 6170
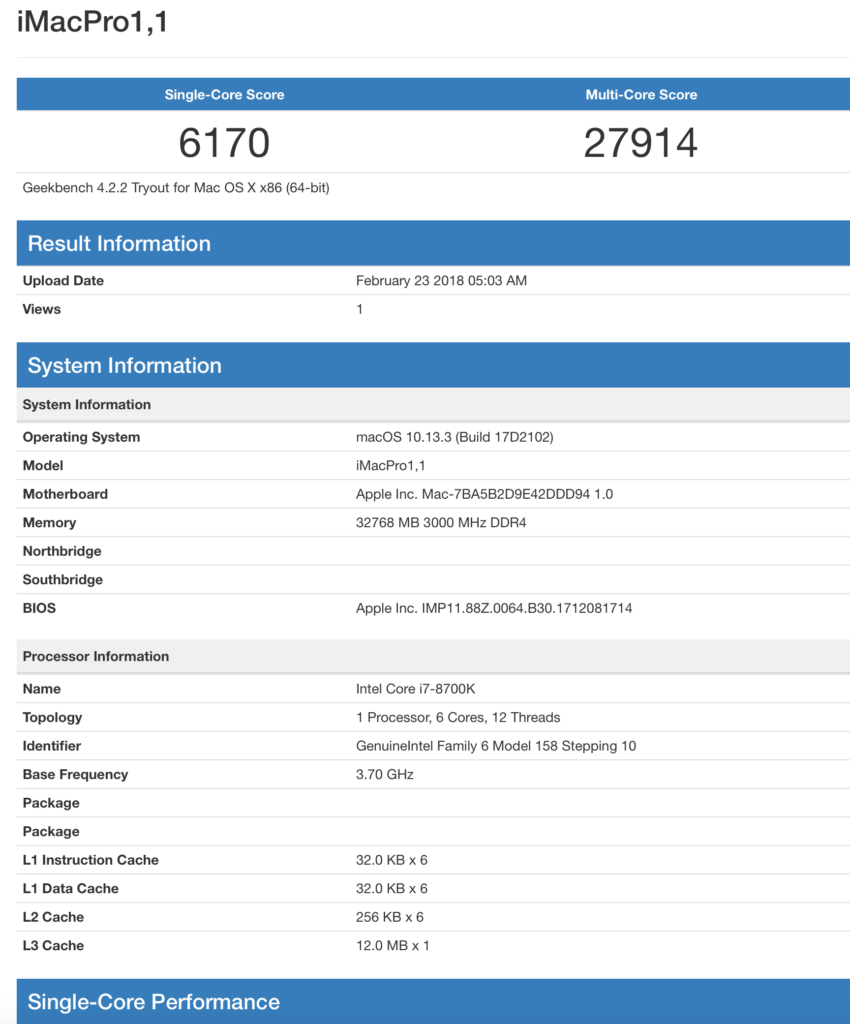
CpuBenchMark_i7-8700k
Geekbench OpenGL and Luxmark OpenCLBenchmarks: Sapphire Radeon RX VEGA 64 8GB Liquid Cooling
- OpenGL Sore: 205542
- OpenCL Sore: 24628


H) Summary
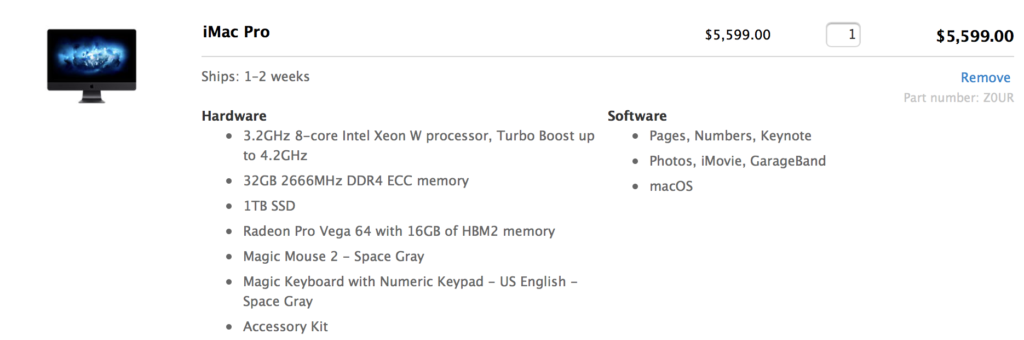
Now time to compare this RIG vs a Real iMac Pro 2018 (8core)
You can save more cost from dual monitors (mine are quite expensive tho :))
My Coffeelake RIG: USD2,300 (Monitors not included)
iMac Pro 2018: USD5,599
Last modified: September 15, 2018


Hello Joe.
I bought your DSDT a little earlier. But i’m stuck.
Can you share your installer? I can’t download iMacPro1,1 since it only downloads whatever version is booted (in my case imac 17,4 and 18,3).
I will donate to coffee for the trouble.
I will prefer to run iMacPro1,1 as I have Vega 64 too now.
The guide works 🙂 Thumbs up! I have some corrections I think might work better. In your guide, you put EFI to Installation disk, before installing OS. Then you install OS and then reboot x-times from USB, and go through installations and all is done. But my system Kernel Panic’ed when I tried to boot from OS System disk (after it was done). I had to install clover (latest version used) on the System disk, then I moved (again) your EFI folder to EFI. Now it booted without KP. All good! 🙂 PLEASE PLEASE make a guide or tell me… Read more »
Gigabyte pulled F5m from the site, replaced it with F5.
Change the filename in the link provided to get the F5m variety.
Lots of issues with OC’ing reported with that release – so they pulled/replaced it rather than leave it listed as an earlier version.
Hello,
Thank you for the build. I just wanted to ask if you were having any issues using a 5k in 5k resolution?
I bought the dsdt.aml file and downloaded the EFI folder from your page..
I already have the install high Sierra on my MacBook Pro, but do not know if it is the same version. I am afraid to download the version you mentioned to my MacBook Pro.
will it replace the one already there?
will my installer version work on your build
I know that it is the 13.3.3 version but not if it is the one you mentioned…
Thanks
can I download it on another (older) macbook?
my mono bios version is F5. cannot find the F5m you mention…
Hello.
I am the same CPU and motherboard as you.
The graphics board is RX 560.
I have already updated to 10.13.4.
There is no problem for now.
It is currently iMac 18.3, but I would like to make it to iMacpro 1.1.
Should I change SMBIOS to iMacpro 1.1?
Since you downloaded your EFI, I’m going to add a 10.13.4 USB patch to KextToPatch and replace the EFI folder.
I am also interested in DSDT. I have not bought it yet.
What will this give me? Is it necessary for me?
Hello!
I bought a copy of your DSDT.aml which is a great piece but have a problem with ALC1220. With the DSDT.aml, internal audio was not available no matter what channel id was injected. Without the DSDT.aml, internal audio is available at channel 1. I was wondering how I was able to sort out the problem.
BTW, does your mackintosh show your GIGABYTE GC-ALPHINE RIDGE add-in card?
Mine is GIGABYTE Z370 AORUS Gaming 7 (BIOS: F5), Intel i7-8700K, 32GB RAM, GIGABYTE Radeon RX VEGA 64 GAMING OC 8G, GIGABYTE GC-ALPHINE RIDGE (rev. 2.0), Samsung SSD 960 PRO 512GB
Hello again!
I have two questions in relation to Gigabyte Z370 AORUS Gaming 7.
1) How did you build your iMac Pro 1.1 special build on a USB flash pen? I have attempted to build one as per your instruction. However, the monitor goes black and sleeps as soon as all verbose log passes;
2) How did you set up your ALC1220 audio?
Best regards,
Isaac
Hi,
I tried to download again,
My DSDT download link has expired.
Do I have to buy it again?
Hello Joe,
I purchased your dsdt and ssdt-usb and I can confirm that everything works much better. You are doing great work! I only have problem with onboard audio.Its not listed in system report and system preferences and its not working. Also in thunderbolt section I dont see my UAD 2 satelite and also in pci section there is no Alpine Ridge. Is there a fix for this? Cosmetics?
My hardware is Gigabyte Z370 Aorus Gaming7,intel core i7 8700k, Saphire Radeon RX 580 Pulse 8gb, Alpine Ridge rev2, StarTech thunderbolt 3 to thunderbolt adapter, TP Link Archer T9E. Best regards
Greetings, I’m running the same board as you and I’ve purchased both the SSDT and DSDT downloads. I’ve added them to the patched folder. I used your guide for installing OSX 10.13.4. It boots, restarts, logins in and seems stable. But… I cannot seem to get motherboard audio out (the “Green” port). I’ve tried injecting 1, 7, and 11 to no success. I’ve added the lilu and apple kexts to the kexts folder on the EFI partition. Also, I can’t seem to booth with multiple displays attached. The displays just seem to time out and go to sleep. I can… Read more »
Hello ClimbJoe.
Thank you for your effort to make the good dsdt and ssdt.
I bought dsdt, ssdt files,
2 files worked on my desktop well.
but..
Today there were some trouble.
The both links (dsdt and ssdt) wrere expired when I tried download repeatedly.
So Would you give me the new link via email?
Hope for reply.
Hello Joe,
I would like to know if I can apply both SSDTs and DSDT (for BIOS F6) to my Hackintosh.
Hello I wrote you on email few weeks back, but I guess you stopped using mail since I can see you are active here. Is the DSDT updated yet? Am I supposed to buy it again? You told me you would send me a new one a month back when F5M was outdated 🙁 My system has had no sound since outdated F5M 🙁 VEGA SPEED THROTTLE: I only have 1 fix that needs attention. When working with H.264 content (or watching certain H.264 .mov or Youtube), our GPU’s degrades (goes to lower clockspeed), until the H.264 content is shutdown/stopped.… Read more »
Hey, Joe.
Thanks for your guide.
I have a problem with the LG 5K UltraFine display, for some reason it’s duplicated.
https://yadi.sk/i/RKZS5uj03VBJKF
https://yadi.sk/i/qQIuyMEF3VBJJ6
https://yadi.sk/i/I2o8GNNl3VBJ7M
Have thoughts and ideas on how to fix this?
I have the following hardware:
iMac 18,3, OS X 10.13.4, clover 4449, i7-8700K, Gigabyte Aorus Z370 Gaming 5, CG-Alpine и RX580 Nitro+, Crucial DDR4-2133 32 Gb, Samsung 950 pro 512Gb, bcm943602baed, Intel I219-V, ALC1220, LG UltraFine 5K, Asus VW248TLB
greetings Joe
Much thanks for Guide, with the exception of the Vega card, i currently have a Radeon 7950, all of the rest of my hardware is the same/similar.
If i am using your EFI folder and your DSDT do i need to disable the DSDT patches in the config.plist?
Hi Joe.
If I have Nvidia GTX 980 GPU can I still build for iMacPro1,1 or do I have to use iMac18,3 guide?
Rest of hardware is compliant GA-Z370 Aorus Gaming 7, 8700k.
Many thanks, Paul.
getting this error “The install failed (The Installer encountered an error that caused the installation to fail. Contact the software manufacturer for assistance.)”
Hi! Thanks for your work.
I have the same configuration, but without th3 card.
I do not see USB 3.1 Bus in USB report. What can be the problem?
By the way, what DSDT and SSDT for? ))
Hi Joe,
I read your guide and bought my PC accordingly. Unfortunately I decided for the Gigabyte AORUS Z370 Gaming 7-OP. I didn’t expect it to be much different, because the only difference was the included Optane Memory, but the BIOS versions differ. Does anyone try to use Gaming 7 firmware on the Gaming 7-OP? Or is it possible that you can build DSDT / SSDT for the Gaming 7-OP BIOS?
Hello, thanks for the guide. Unfortunately, when I try to boot USB installer, it hangs for a minute at HID: legacy shim 2, then it says “Still waiting for root device…”, all text becomes garbled and a forbidden sign gets displayed. My rig: – Aorus Gaming 7 on F6 BIOS – 8700k (not OC’d yet) – Thermaltake Riing 3.0 – Strix GTX 1080 OC – 32GB DDR4 Vengeance LPX – 512GB 960 PRO, 2TB WD BLACK, 2TB Barracuda – Corsair Hx1200i PSU – 4K monitor attached via DP USB installer is a Sandisk 16GB 3.0 Pendrive. I tried plugging in… Read more »
이번에 번역판은 없나보네요 ㅜㅜ
Hi Joe,
I’m looking at doing a similar build. I already have two LG 5K Ultrafines running on a macbook pro but it seems to struggle with them. I was looking at a build with a i7 7700k running on a Gigabyte Z270X with a GTX 1050ti 4GB. Do you think this card would work with at least one of the 5K monitors? I guess it would be impossible to run two monitors as you’d need two adapter cards?
Cheers,
Steve
Hi Climbjoe, I bought your DSDT(F5,F6), SSDT-USB, SSDT-PCI.aml. but Today, I tried to open the links, but the All link were expired. Would you give me new links of all?
Expect your fast reply !
Hi! My “real” Mac I’m creating the installer from is on 10.13.6 and the pkg building fails with error:
productbuild: error: Could not read “./091-86775/091-86775.English.dist”. (Line 1: Space required after the Public Identifier
Line 1: SystemLiteral ” or ‘ expected
Line 1: SYSTEM or PUBLIC, the URI is missing
How can I get an “Install macOS High Sierra.app” on my machine?
Hi Joe. I’m a little confused. Does this method enable Thunderbolt hotplug?
Hi Joe great work! I’m interested in the DSDT and SSDT-USB fix (although not entirely sure the relationship between them)… do I need both to get my USB 3 working properly? The problem is that I am on BIOS F7 already…
Hi, Joe
BIOS F7 was released.
Does not release DSDT (BIOSv.F7)?
I tried updating the BIOS from F6 to F7.
There seems to be no problem in DSDT (BIOSv.F6).
Multiple Graphic Cards…
I want to add another graphics card to the system…
OR just add Sapphire Pulse Radeon RX 580 8GB 11265-05-20G to the system…
What do I need to do to properly add the card?
I need all 5 ports operating…
Adjust the DSDT?
How can we enable the integrated graphics (full acceleration) on this board
Hello
your work can be used on the motherboard asus rog maximus x hero
Greetings Joe,
I see you have updated the DSDT for Bios v7, do i have to purchase the new version or does my purchase of the Bios v6 cover updates to the Bios.
Respectfully,
david
[…] iMac Pro 1,1 […]
Hey! is it possible to add new DSDT for the latest F10 bios with 9 series CPU support?
Hi Joe. I’ve bought your ssdt and dsdt files. My setup is similar to yours, except for the gpu which is a asus rx580 4gb.
I experience extreme lag on the screen. Dragging the mouse or windows across will result in choppy movements and delay (the window does follow the cursor, but hangs a few inches behind on the screen). When moving the mouse it’s almost like theres a lot of motion blur added. My screen is a 4K Ultra Wide 21:9 screen connected to the display port on the rx580.
What am I doing wrong?
Hello there. I cannot make it see more than 32gb ram. I have 2 32gb ballistix cards installed