
Today, I am going to share a setup guide called ‘LG UltraFine 5K monitor for Customac Build’.
One of the High-End monitor, LG’s Ultrafine 5K, is sold by Apple local store or online. Actually, this monitor is only for Apple’s Mac. Yet, this monitor is working as a 5k monitor in Windows 10 well. However, peripheral features of this monitor are not working properly in Windows. So far, the Audio and Video is working but not Camera and Mic working in Windows. There is some way to fix those functions even brightness control using patched drivers but it is painful after Windows update. A good news about this monitor is working much much better in Customac. Yet there are several required steps and devices to enable this monitor and use properly.

[Updated] 2018.11.28 Titan Ridge is officially working in my Z370 Aorus Gaming 7 now. See Compatibility list

[Updated] 2018.11.05 Alpine Ridge and Titan Ridge’s Hot Plug fixed by using SSDTs. So All functions back to use after sleep/awake. No more power issue to make the display in power nap mode! see more detail at last.
Current system:
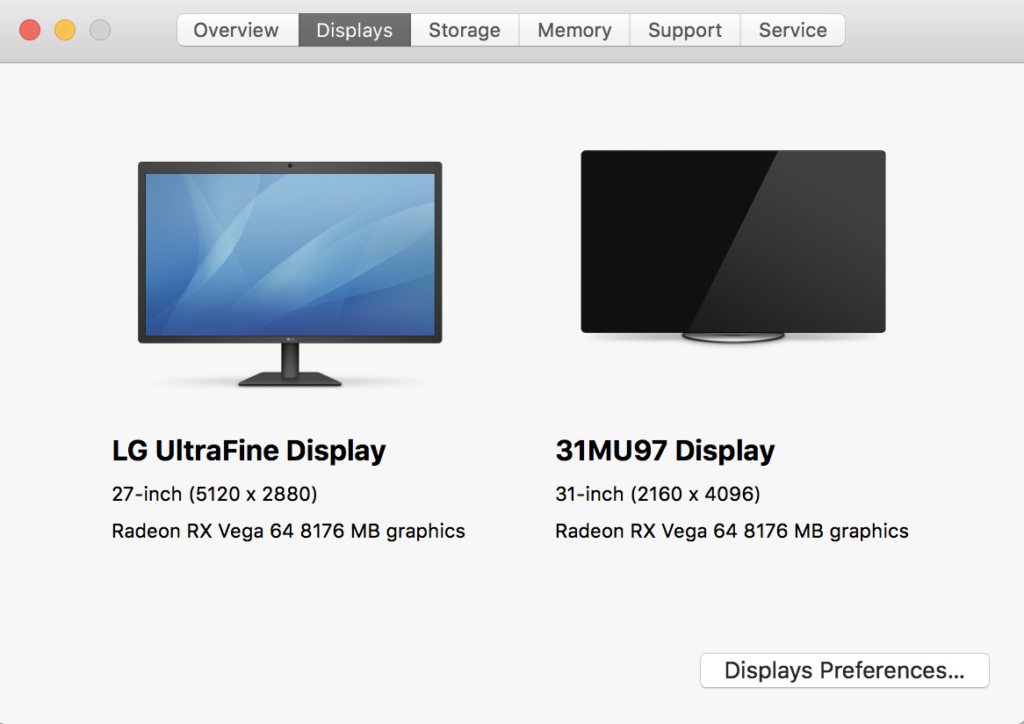
I am using dual monitors,
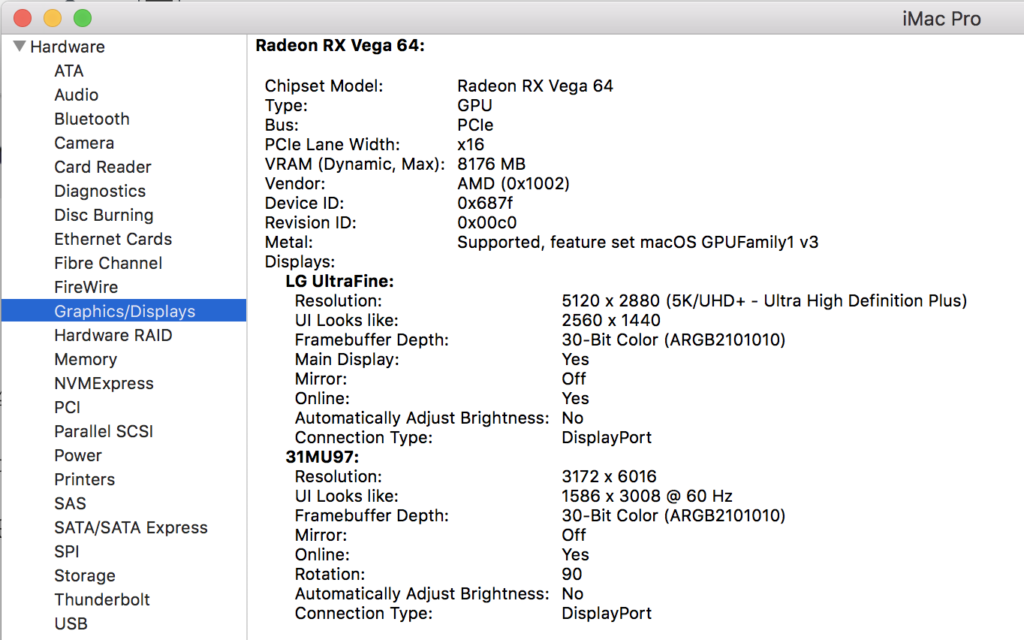
1. LG 31MU97 (4K Cinema),
2. LG UltraFine 5K.
Vega 64 water cooling card is working well for both 4K and 5K resolution in 60Mhz. There is a possibility of using Nvidia Card like Geforce 1080 or Titan XP but they need to Nvidia driver and some patched kext in every time when OS is updated.
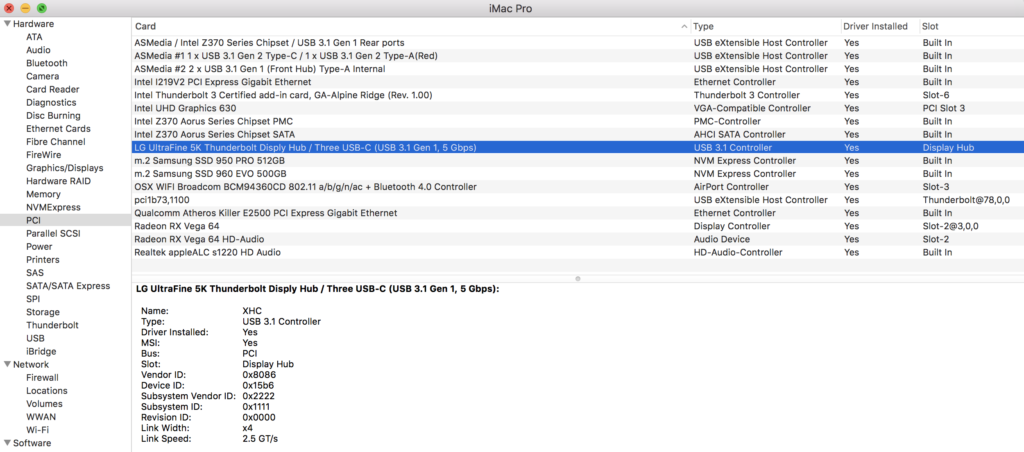
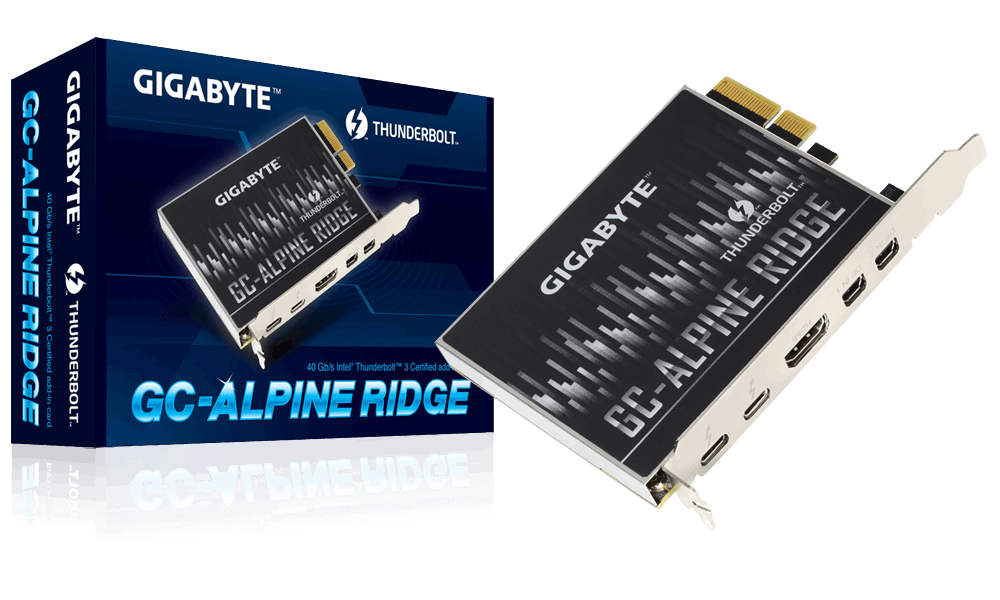
To enable 5K in your Customac, you must have “Thunderbolt 3 adaptor” in my case I am using GA-Alpine Ridge Thunderbolt 3 adaptor PCI card because I am using Gigabyte board. If you are using different brand’s MB, you have to get it properly.
The adaptor brings two cables (mDP to DP) so that we can connect the card to GPU simply. For 5K resolution enable, we need both cables. You could use one cable for up to 4K resolution.
Currently, my Customac is High Sierra (10.13.5). And I checked it working as well in 10.14 Beta. 10.14.2 beta so far so good!!
Hardware Overview
- CPU: Intel Core i7-8700K (8086K) Coffeelake 6-Core 3.7 GHz (4.7 GHz Turbo) LGA 1151
- Motherboard: Gigabyte Z370 Aorus Gaming 7
- GPU: Sapphire Radeon RX VEGA 64 8GB LIQUID COOLING
- Ram Memory: G.SKILL Ripjaws V Series DDR4 16gb x 4ea, 3000mhz
- System Disks: 960 EVO NVME 500gb (macOS) + 950 PRO NVME 512gb (Windows 10)
- Power: Rosewill PHOTON Series 1050W Full Modular Gaming Power Supply
- Case: Deep Cool Quadstellar
- Mouse & Keyboard: USB Mouse and Apple Magic Keyboard
- Monitors: LG UltraFine 5k, LG 4k Cinema
- CPU Cooling System: NZXT Kraken X62 (RL-KRX62-02) Liquid Cooling
- Thunderbolt 3 (USB-C) adaptor: GA-Alpine Ridge or GA- Titan Ridge (After Bios F11)
”
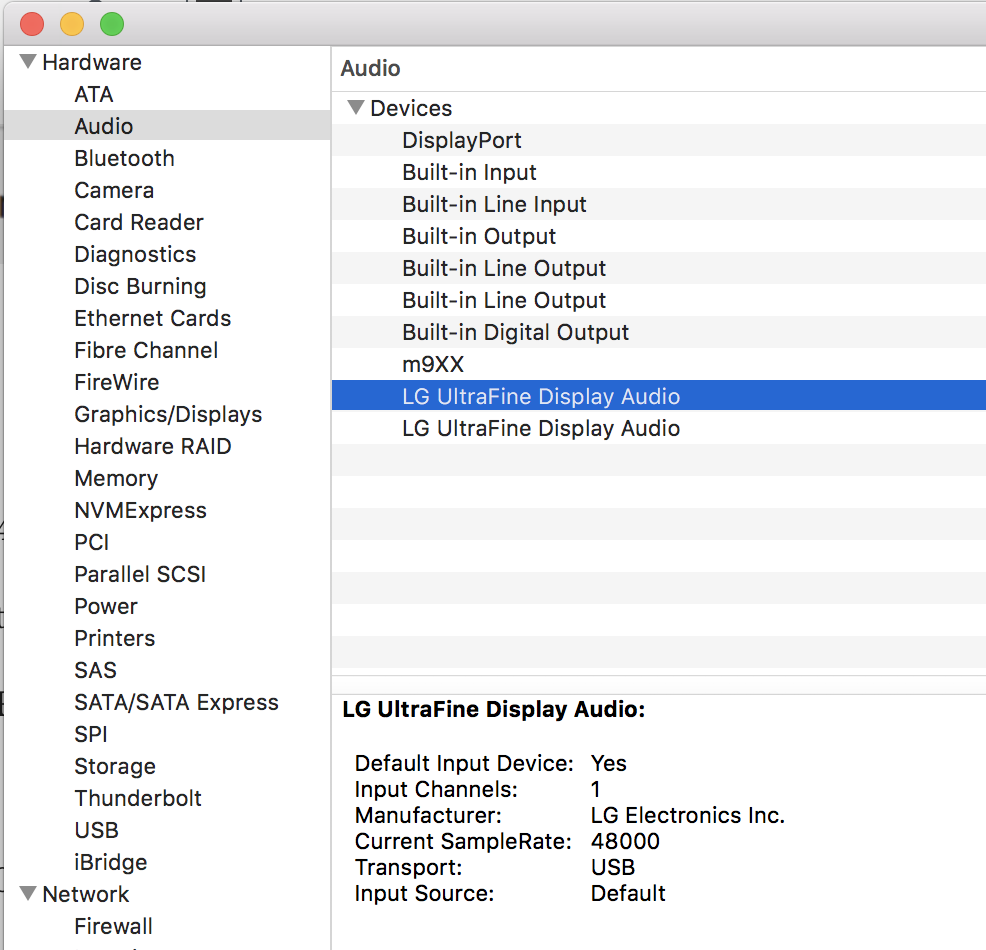
As you can see my screenshots, all the monitor’s functions are working well. “After sleep/awake issei’s is gone with NEW SSDT injection for Alpine ridge and Titan Ridge”


Physical Setup:
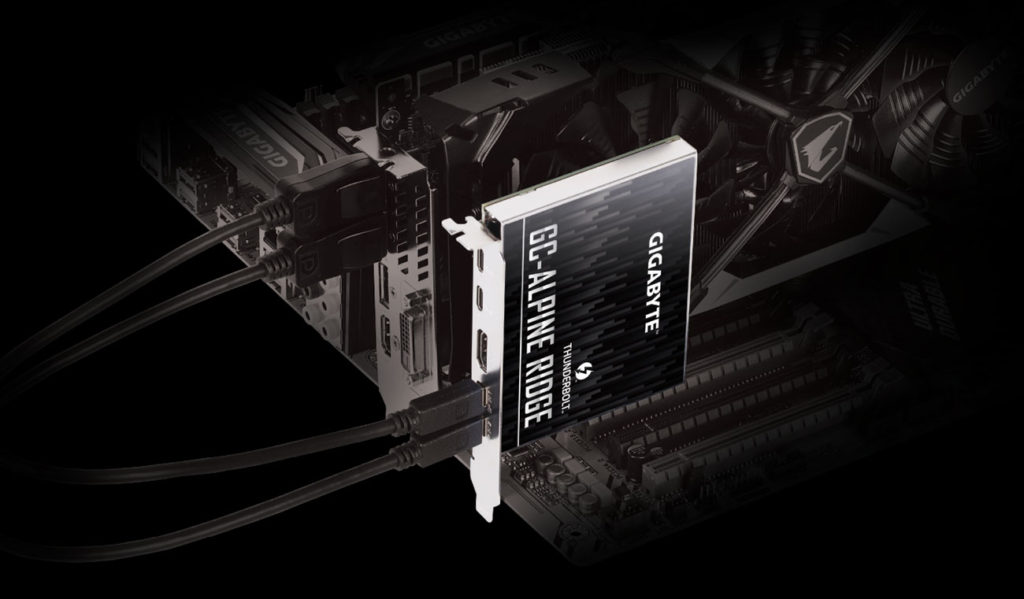
First, insert your Alpine Ridge card in MB. In the MB’s manual, I should put the card to the last PCI x16 slot for TB3 working. So, please look at your MB’s manual about this installation.
Do not connect your cables yet to the card. Currently, I am using the Alpine Ridge Rev.1.0. But this guide is also working with Titan Ridge as well.
Step 1. You can use either iMac pro or iMac 18,3 build in my blog for this build. Probably, ok if you have a working Customac in higher than Sierra. But please check your MB for compatibility with Alpine Ridge Card.
Step2. Install the TB3 Driver and update firmware up to the newest in Windows. There is no way to make Alpine Ridge card recognized in Customac without Windows’s driver installation and firmware update.
Step3. After all driver and firmware are done in Windows side, you should go to Bios and edit the Thunderbolt (TM) Configuration options like below:

After you are done with Step 3, then you can test your monitor on in Windows. mDP to DP cables x2 and THB-C Header Cable x1 come with the Alpine Ridge card. And USB-C cable comes with the monitor. So now it is time to connect those cables from the TB3 card to the monitor. And do not forget to connect THB-C Header Cable to MB’s THB-C Header. See some pictures to set up this process.

![]()
I have two monitors as I already mentioned before. And I am using UltraFine 5K for my main monitor now. Therefore, mDP 1 and 2 go to DP 1 and 2 (Blue). But if you want to use another monitor as a main, DP 3 (Green) should be connected to DPNo.1’s port and Blues go to DP 2,3. This main monitor setting is only for Bios setup and Booting process, but you can change the Display option in System Preference, as you could do pick any monitor as your main but only after boot. The last cable, USB-C (Yellow), goes to LG UltraFine 5K directly. Physical setup is done now.
But Customac is not gonna work with the monitor yet. We must do a couple steps for Customac being recognized.
Step 4. Go to Windows at least once after your physical setup’s done. And confirm the TB3 app (driver) is working properly and check the detail that your monitor’s name correctly shown in the app.
Step 5. Reboot your computer and go to macOS in this time and Mount your EFI using the Clover configurator. In this step, you must take out DP no.2 from the Alpine ridge card. So you could avoid a black screen after macOS booted. If your setting is ok your LG UltraFine 5K monitor turning on with 4K resolution. Now you have to setup for software part.
If you are using AMD card like Vega, add this AMD kext VegaGraphicsFixup.kext to your Other folder in EFI. Add this boot Argument (No more use this) And all is set to use for AMD user. slide=0
And for Nvidia user, you need to add these NVIDIA kexts Nvidia5K.kext to the other folder in EFI. (No more further update for Nvidia card RIP)
Plus, boot Argument is :
-v slide=0 kext-dev-mode=1 keepsyms=1 -ngfxnoaudio -ngfxnoaudiocon ngfxpatch=pikera nv_createDetailedTimingsFromEdid=1
And you all set for Nvidia as well. I am not using Nvidia card so I can not answers for Nvidia issue. But there is a forum that you could get the answers at here
Now, reboot again. Put the DP2 cable back to the Alpine Ridge card and you are all set to use this amazing monitor for your Customac.
It might not work your peripheral functions like audio, camera, brightness control after sleep / awake. This is TB3’s hotplug issue which is not resolved completely yet. I don’t use Sleep/awake option tho.
SSDT-TB3 Hot plug for Alpine Ridge and Titan Ridge For UltraFine monitor and extra TB3 devices!!

Last modified: January 11, 2019


Hello, it seems great ! Do the webcam and brightness control work natively ?
안녕하세요 선배님
질문이 있어서 글을 올립니다.
-1
디피 포트 -2 에 케이블을 꼽으면
화면에 변칙적으로 블링크가 됩니다 [검은 화면으로 전환되었다가 다시돌아옵니다 ]
하지만 디피포트 -2 를 뽑고 디피포트 1 만 연결하여도
해상도는 5120 -2880으로 유지되고 블링크가 되지 않습니다.
이유를 모르겠습니다 ㅠㅠ
하나로 유지해도 되는 것인지아니면 디피포트 -2 를 블링크되지않게하는 법이 있을까요?
-2
선배님이 올려주신 ssdt파일을 구매하여 다운로드하였습니다.
적용방법이
클로버에서 마운트 – > 오픈 파티션 -> 이피아이 -> 클로버 -> 에이시피아이 -> 패치드
의 경로에 다운로드받은 파일을 올리기만 하면 적용되는 것이 맞나요 ?
연휴 잘보내세요 : )
[…] [Edited] 2018.10.25 – LG Ultrafine 5k sleep/awake issue fixed!HotPlug working perfect! See my »»»LG Ultrafine 5K guide. […]
Hi there, quick question.
Is the Alpine Ridge SSDT I can buy here, the same one I would buy from the Mojave iMac Pro guide?
(Already bought one, so don’t want to buy it twice)
Joe, quick question: I’m using the z370 Aorus gaming wifi (slightly different from z370 gaming 7) with the LG 5k. So far it’s working ok, just that it doesn’t show up in the system report, and I can’t use the camera / speakers. To implement the SSDT for the thunderbolt fix, do I need to edit it with Maci? if so, what do I need to change in order for it to work with my (slightly) different motherboard? Everything else is pretty much the same as your build, (Alpine Ridge rev 1) Thank you so much for putting this together.… Read more »
Hey !
Can’t wait to test these SSDT, thanks a lot again, do you know if I can use this SSDT with same config that yours without VEGA but RX580 ? I don’t know if 5k works with RX580.
hi joe,
thanks for the guide. do you have ssdt for tb3 to download?
is there anyway i can chat with you personally.
thanks.
Do you mind running this command to see how the display and monitor are handling the connection? It would be helpful for a lot of people in some other Hackintosh forum! We need the .txt file the command generates, could you share that if you are willing to help us?
/System/Library/Extensions/AppleGraphicsControl.kext/Contents/MacOS/AGDCDiagnose -a > AGDCDiagnose_a.txt 2>&1
Thanks a lot for your help!
Joe, Thanks for the great tutorials. I’ve had some success but not quite there yet with booting into macOS. Windows appears to work fine and I think it’s scaled to 4K. When booting into macOS using Clover I have no luck after the bootloader screen even when removing DP no.2 from the Alpine ridge card. Not sure if its related to a memory issue, I’m not using any EFI fixes or iGPU modifications so that could be a route. Any thoughts or feedback on this welcome. Here are my specs: Z390 Designare i7-8086K Sapphire Pulse Radeon RX 580 Alpine Ridge… Read more »