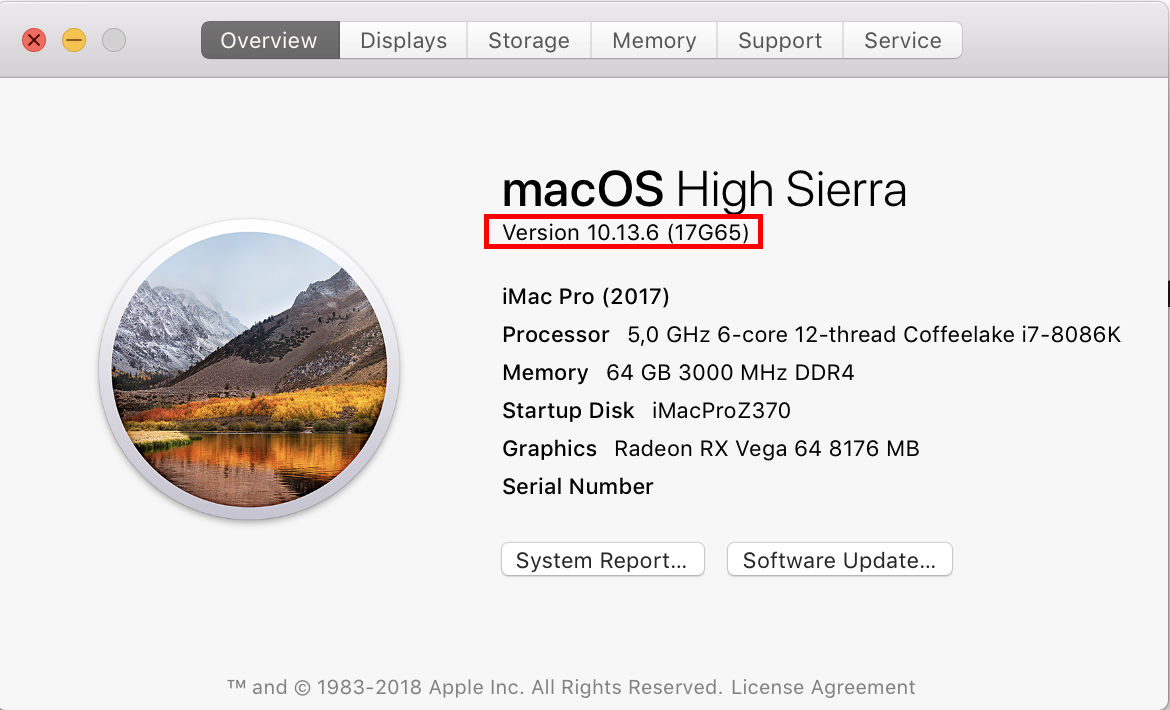
This guide shows how to install macOS 10.13.6 on Coffee Lake System.
- Components
- Create USB installer
- Motherboard BIOS Setup
- Installing and stabilizing macOS
- Graphics card settings
- Download macOS.
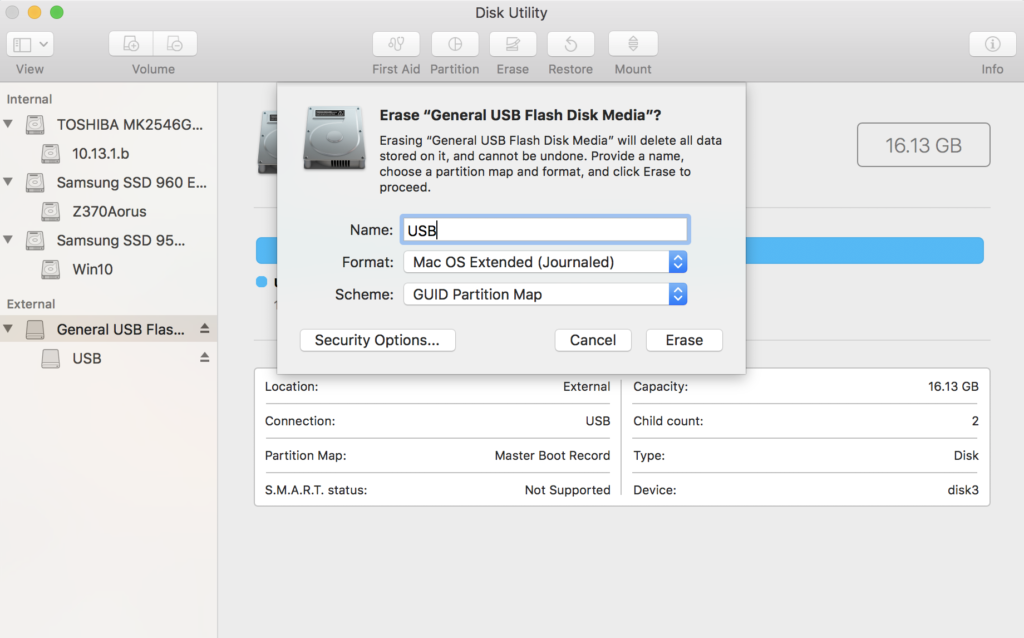
- Format USB Drive. You need Real Mac machine or Virtual machine to make EFI partition.
- Insert a USB drive of 8GB or more into the back of the computer.
- Open Disk Utility and select your USB in the left sidebar.
- Click Erase and set Name: USB, Format: Mac OS Extended (Journaled), Scheme: GUID Partition Map.
- Insert a USB drive of 8GB or more into the back of the computer.
Open Disk Utility and select USB in the left sidebar.
Click Erase and set Name: USB, Format: Mac OS Extended (Journaled), Scheme: GUID Partition Map.
If you do not see the Scheme setting, click View in the upper left corner and select View All. - Click Erase
- Click Done
- Open Terminal and copy and paste the entire text below, then press Enter.
sudo /Applications/Install\ macOS\ High\ Sierra.app/Contents/Resources/createinstallmedia --applicationpath /Applications/Install\ macOS\ High\ Sierra.app --volume /Volumes/USB/
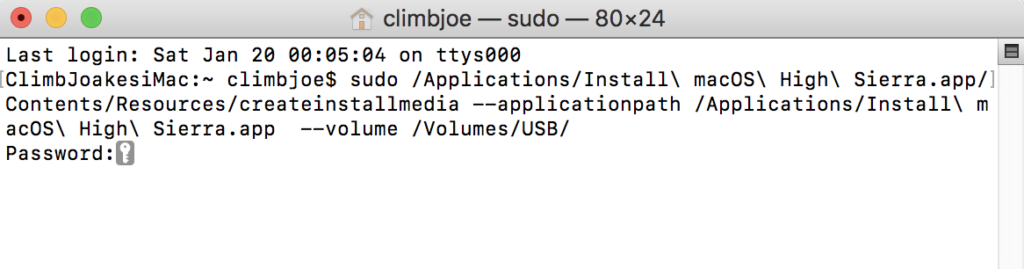
- Enter the password, press ‘Y’, then press Enter again.
- USB installation for between 20-60 minutes will be ready. Until then, you should never unplug USB.
- After installation, make it bootable via USB.
- Download Clover Configurator
- Open Clover Configurator.
- Mount EFI to mount the partition on USB where macOS is installed.
- Click open partition, download EFI and copy and paste it.
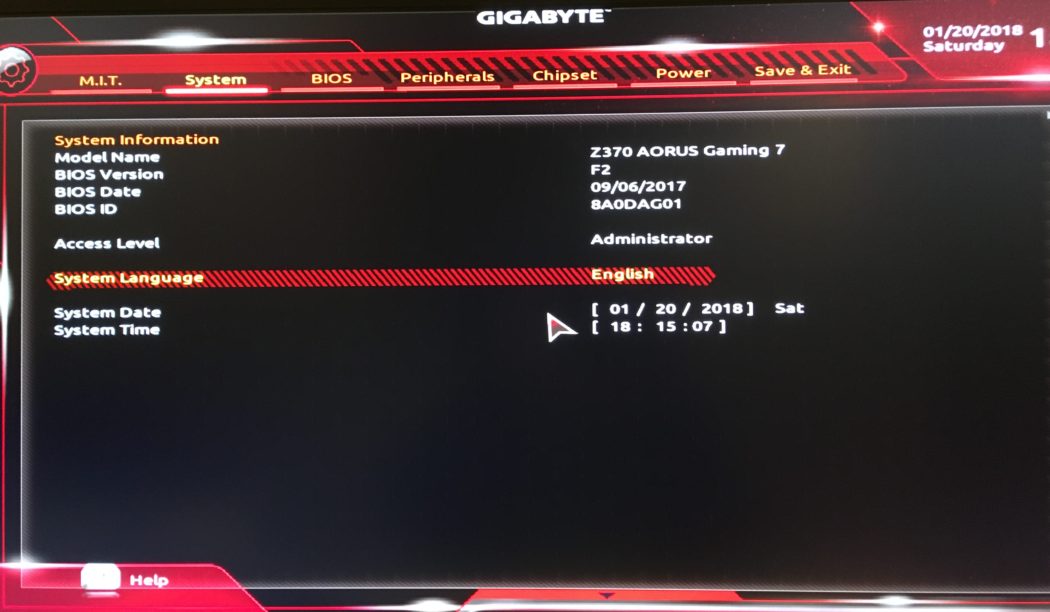
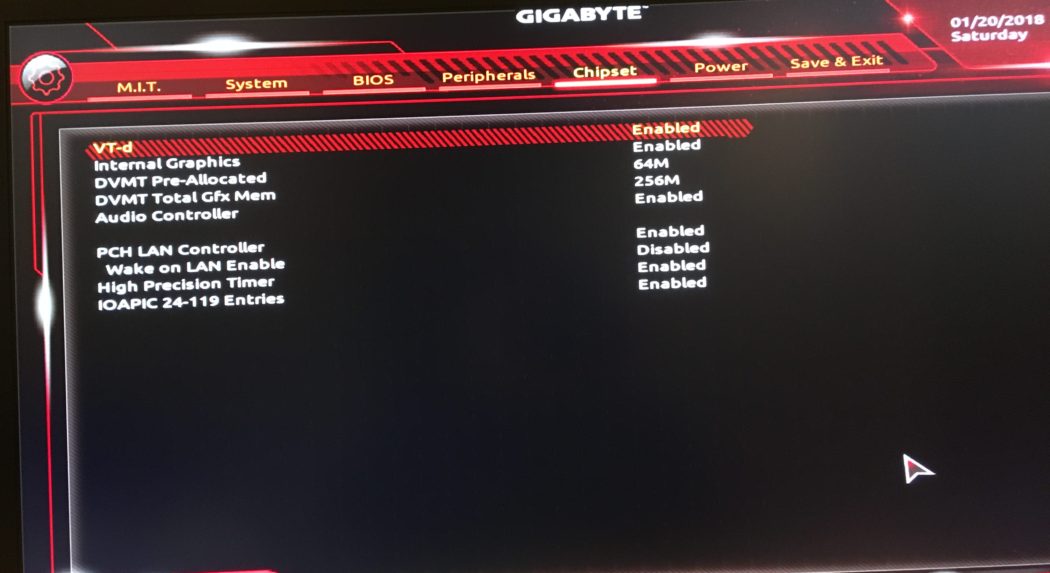
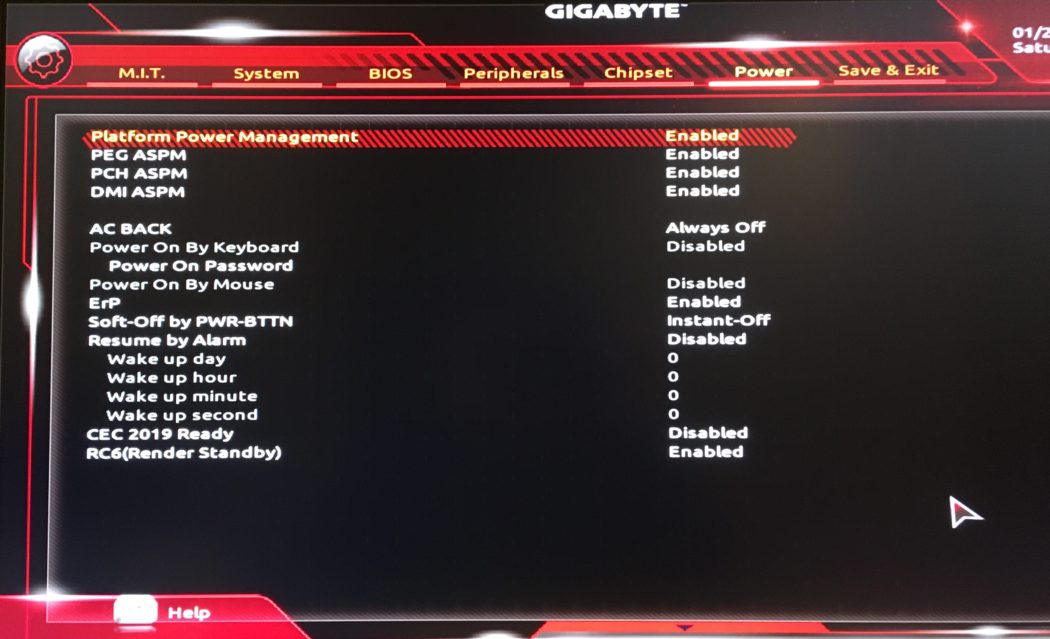
You can change the BIOS setting to Optimized Default and change it to the following settings. If possible, update the BIOS to the latest version.
- Virtualization: Enabled
- VT-d: Disabled
- XHCI Hand-Off: Enabled
- Legacy USB Support: Auto/Enabled
- IO SerialPort: Disabled
- Network Stack: Disabled
- XMP Profile : Auto / Profile 1/Enabled
- UEFI Booting set to Enabled and set Priority over Legacy
- Secure Boot: Disabled
- Fast Boot: Disabled
- OS Type: Other OS
- Wake on LAN: Disabled
Depending on the manufacturer and the BIOS version, there may be a difference in the names, but there seems to be no major difference. Once you have set up your MacOS installation, it’s a good idea to change it to your own configuration later.
The attached photos are the bios configuration of the system I am currently using. (Gigabyte z370 Aorus Gaming 7 Bios v.F2)


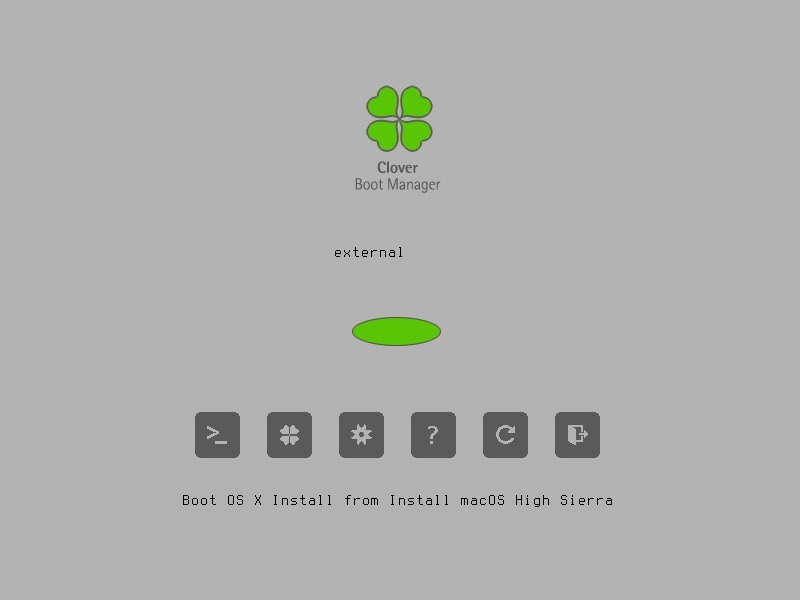
In BIOS setup, set to boot by USB first.
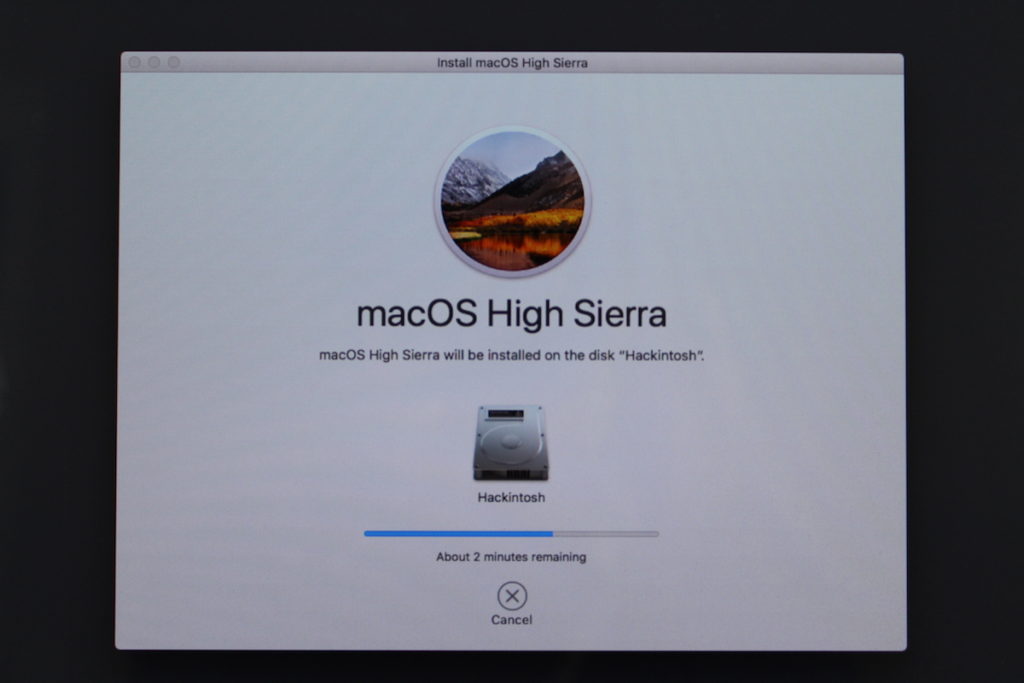
- Select Boot OS X to install from Install macOS High Sierra.

- Format and Install
- When Installer appears, press Continue.
- Choose your preferred language
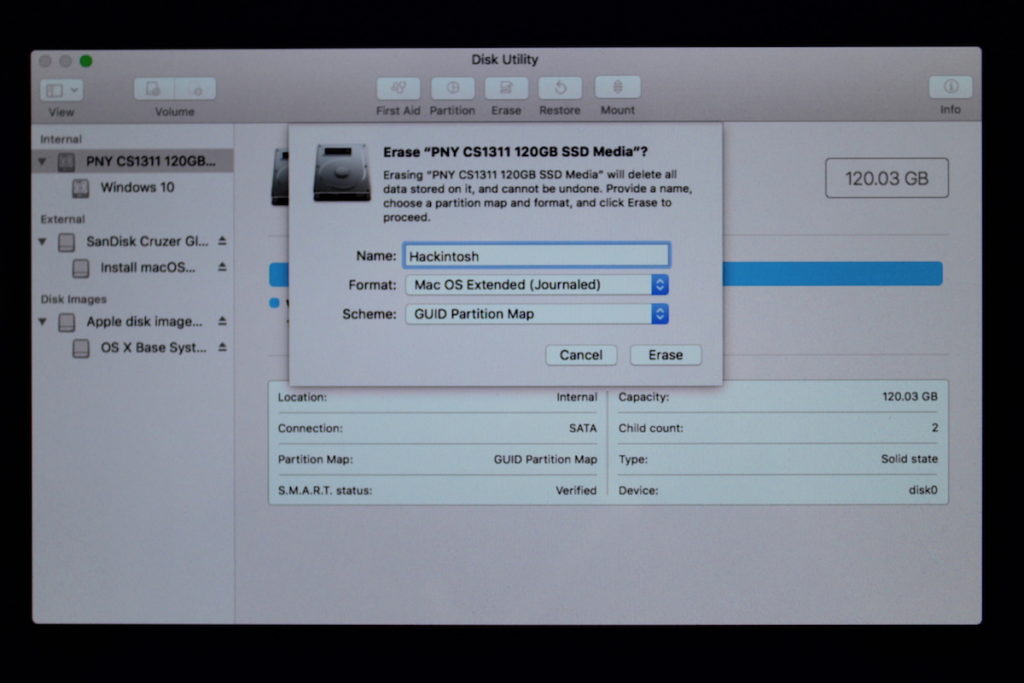
- Select Disk Utility from the Install menu
- Click the View button in the top left corner to select Show All Devices.
- Select the disk to install macOS and set it as below.
- Name: (It can be named anything you want)
- Format: Mac OS Extended (Journaled)
- Scheme: GUID Partition Map
- Press Erase, close Disk Utility, and start the installation.
When the installation is finished, it will be restarted and you will see the name of the newly installed macOS in the clover boot menu. Now select macOS and press enter.
Then the installation continues as shown below.
- First booting with macOS
- Once the macOS installation is complete, it automatically reboots and the clover boot screen appears again.
- Select the installed macOS and press Enter to display the High Sierra initial setting screen.
- Once you have made the various settings (do not set the Internet yet), the Sierra desktop will open.
- After completing the setup, replace the EFI folder so that you can boot by yourself.
- Download Clover Configurator
- Open Clover Configurator.
- Mount EFI to mount the partition where macOS is installed.
- Open Partition, download the EFI folder and copy and paste it.
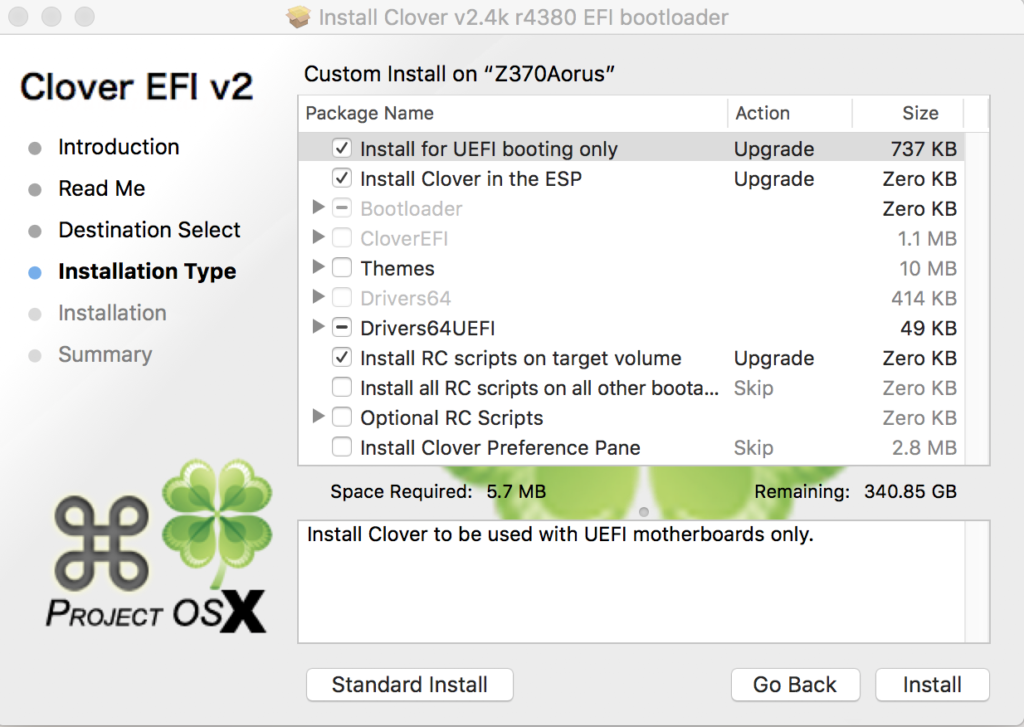
- Install the latest version of Clover.
- In the Clover, Configurator select Install/Update Clover and install the latest one.
- When installing the clover, click Customize and select the options as shown below.
- Install for UEFI booting only, Install Clover in the ESP, Dirver64UEFI>>EmuVariableUefi-64, OsxAptioFix2Drv-64, Install RC scripts on Target volume
Now you can boot to the hard disk where you installed macOS without booting to the USB drive. Enter the BIOS setup and change the boot order to [UEFI] MacOS installed disk to the priority boot.
If you currently use AMD’s graphics card, you do not need to set special EFI settings, but Nvidia needs to install a web driver, and if you have Intel built-in graphics, you need to change the device ID.
For Nvidia graphics, drivers up to 6 series are natively identified without the need for driver installation. However, since 7 series, web driver should be installed, and whenever the OS is updated, the appropriate web driver must be installed to use the graphics card with proper performance. For AMD, nothing else can be set for the current RX Vega 64 and lower HD series. It does not need drivers and performance is better than Nvidia. You only have to set it aside from sleep/wake or built-in graphics.
- Enable iGPU (Intel Integrated Graphics)
Intel’s i3, i5, and i7 series, which we commonly say, have their own built-in graphics cards for each generation. Of course, the built-in graphics card cannot be used for games or editing, but thanks to the day-to-day development, it has evolved to be able to play low-end games and simple editing. In particular, H.264 or H.265 (HEVC), which boasts a superior compression ratio among editing codecs, is heavily influenced by the CPU. Therefore, if the built-in graphics are enabled, it can greatly reduce the CPU load and improve the rendering speed. It seems as important as it seems to be essential for users who are using Nvidia cards as main.
First, you need to enable the integrated graphics card. It is recommended to set it at the time of installation as already explained in the BIOS setup above.
- Integrated Graphics: Enabled
- Graphics: IGD/Integrated/iGPU/CPU Graphics (If there is only built-in graphics, this is how to set it. If you want to use external graphics as main, set PEG / PCIe Slot 1)
- DVMT Pre-Allocated: 64M or 128M
If you copy and move the attached EFI after installing macOS, the core files are already installed. After that, you only need to change the settings related to graphics in the Config.plist file.
Since EFI attached to this article has a config file for the current system, you should replace it with the proper config file for your build.
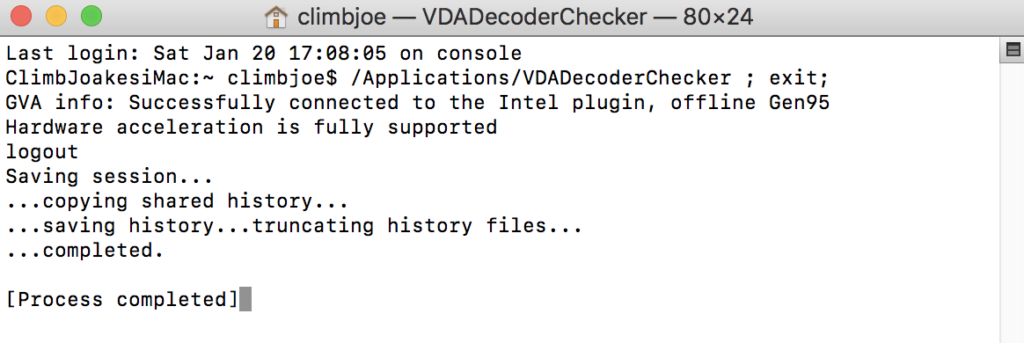
You can use VDADecoderCheckto see if your internal graphics are working well.
Now I complete the Hackintosh Guide for the i7-8700k Coffee Lake System.
Last modified: September 15, 2018


Hey I have the same system hardware but not AMD Vega. Is it ok using your EFI for my Nvidia card?
Hi, I have a question. I used your guide to set up a hackintosh but my setup uses 8700 instead of 8700k. Under ‘about this mac’ it lists it as unknown CPU. I tried to fix it by modifying AppleSystemInfo.strings in PrivateFrameworks and also by generating Coffee Lake ssdt following this guide: https://hackintosher.com/guides/generating-coffee-lake-ssdt-hackintosh/ but none of it helped. Is there any way to change it so it will display proper CPU name?
Hello, I tried this guide after not being able to successfully run the Installer with the iMac Pro 1,1 one, and unfortunately I keep getting the same error: “Still waiting for root device”. I reloaded optimized defaults in BIOS, then changed every setting as described in the guide. I tried switching USB port, using another USB drive, but no avail. I’m running F6 BIOS by the way, dunno if I should try to downgrade to F2 BIOS I see in the screenshot. Hopefully doing so won’t cause problems with Windows and overclocking. My build is almost exactly equal to yours:… Read more »
Does this guide still work for 10.13.6?
Hey Climbjoe~ I have bought SSDT-UIAC-041218.aml last week. It is really nice and shows good working. so happy to see computer is getting closer real mac ^^. But when I click the link that you sent is something wrong (Sorry but your download link has expired.) Figure it out plz~~
ah~ it works well for 10.13.6