Hi folks!
I’ve successfully upgraded my macOS Catalina (10.15.7) to macOS Big Sur (11.0.1) with my original Clover boot loader through a normal apple’s update method. If you still using my EFI from Catalina, you could do update your macOS as well with some modification. I will show how to do that in this post.

Modify EFI with Clover Configurator.
- Mount EFI with Clover Configurator (a.k.a ‘CC’)
Use the latest CC to update your previous Clover boot loader to the newest.
You should mount your system first and then see Tools section. - Update your Clover
Click Install/Update Clover.
Upgrade your Clover to v5126 (current the newest).
Install it. - Modify config.plist
Open your EFI > Clover > config.plist CC. See Quirks section.
Check (enable) AvoidRuntimeDefrag. Then Save it.
Close it.
Open the config.plist file with BBEdit (from App Store).
Using find tool (Command+F), search ‘Quirk’.
Replace whole <dict>part under <key>Quirks</key> to below code. And Save it. When you done with it you could see those in Quirk section.
<dict>
		<key>DisableLinkeditJettison</key>
		<true/>
		<key>PanicNoKextDump</key>
		<true/>
		<key>LapicKernelPanic</key>
		<false/>
		<key>ThirdPartyDrives</key>
		<false/>
		<key>SyncRuntimePermissions</key>
		<true/>
		<key>XhciPortLimit</key>
		<true/>
		<key>EnableWriteUnprotector</key>
		<false/>
		<key>PowerTimeoutKernelPanic</key>
		<true/>
		<key>DummyPowerManagement</key>
		<false/>
		<key>ProvideMaxSlide</key>
		<integer>0</integer>
		<key>ProvideCustomSlide</key>
		<true/>
		<key>EnableSafeModeSlide</key>
		<true/>
		<key>ForceExitBootServices</key>
		<false/>
		<key>ProtectSecureBoot</key>
		<false/>
		<key>DisableVariableWrite</key>
		<false/>
		<key>DisableRtcChecksum</key>
		<false/>
		<key>DisableIoMapper</key>
		<true/>
		<key>AvoidRuntimeDefrag</key>
		<true/>
		<key>MmioWhitelist</key>
		<array>
			<dict>
				<key>Address</key>
				<integer>4275159040</integer>
				<key>Comment</key>
				<string>Haswell: SB_RCBA is a 0x4 page memory region, containing SPI_BASE at 0x3800 (SPI_BASE_ADDRESS)</string>
				<key>Enabled</key>
				<false/>
			</dict>
			<dict>
				<key>Address</key>
				<integer>4278190080</integer>
				<key>Comment</key>
				<string>Generic: PCI root is a 0x1000 page memory region used by some firmwares</string>
				<key>Enabled</key>
				<false/>
			</dict>
		</array>
		<key>ProtectMemoryRegions</key>
		<false/>
		<key>SetupVirtualMap</key>
		<true/>
		<key>ProvideConsoleGopEnable</key>
		<true/>
		<key>ExternalDiskIcons</key>
		<false/>
		<key>AppleXcpmCfgLock</key>
		<false/>
		<key>DevirtualiseMmio</key>
		<true/>
		<key>ProtectUefiServices</key>
		<true/>
		<key>AppleXcpmForceBoost</key>
		<false/>
		<key>CustomSMBIOSGuid</key>
		<false/>
		<key>IncreasePciBarSize</key>
		<false/>
		<key>DisableSingleUser</key>
		<false/>
		<key>DiscardHibernateMap</key>
		<false/>
		<key>FuzzyMatch</key>
		<false/>
		<key>AppleXcpmExtraMsrs</key>
		<false/>
		<key>RebuildAppleMemoryMap</key>
		<true/>
		<key>AppleCpuPmCfgLock</key>
		<false/>
		<key>SignalAppleOS</key>
		<false/>
	</dict>
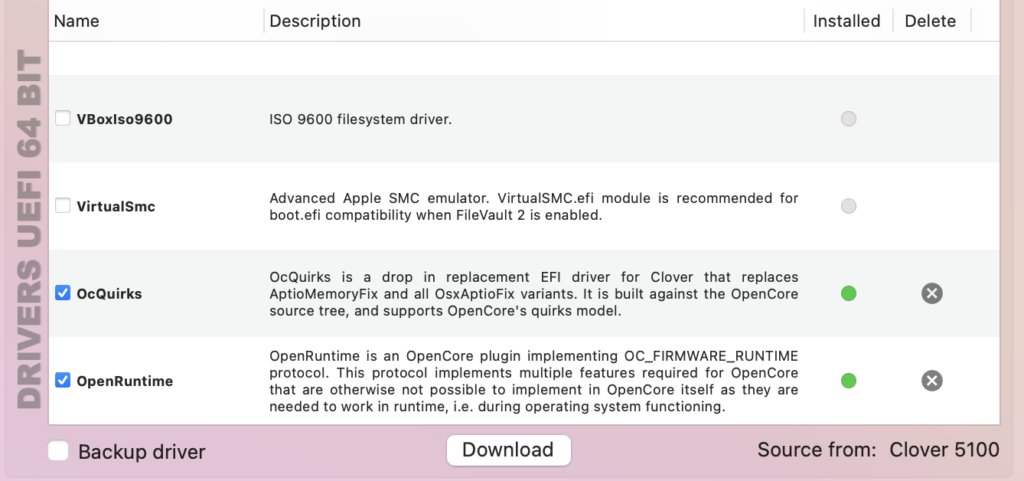
4. Install new drivers and remove old drivers.
In Install Drivers section in CC, find OCQuirks and OpenRuntime. Install those two files. Delete AptioMemoryFix or related files for Memory like OsxAptioFix. Make sure in your folders that you properly delete and install. Your system will not boot if you made mistakes here. Just get a backup EFI that you could do use when you get stuck in boot just in case.
5. Download this SSDT file and put is in EFI>Clover>ACPI>Patched
6. Reboot your system.
7. If you do boot well with it, just update your system to Big Sur either App Store or system update methods.
8. If your booting is failed, do the steps again.
I will post USB clean installation guide for Big Sur soon.
Last modified: November 14, 2020